When the browser makes a request on the Web server it asks to load FoxISAPI.dll via a URL link very much like this:
Building applications with FoxISAPI
By Rick Strahl, West Wind Technologies
http://www.west-wind.com/
Session notes from the Visual FoxPro DevCon '98 in Orlando
Sample Files, Doc and Slides
See how to build Web Server applications with Internet Information Server and FoxISAPI to take full advantage of Visual FoxPro's speed and power. Discussion starts with the basic mechanics of ISAPI and the FoxPro interface and examples on how to service basic requests and common operations performed in requests. We'll also cover how to debug FoxISAPI requests, deal with scalability issues and integration of FoxISAPI with other Web and COM technologies. You'll also see examples on how to extend FoxISAPI with custom classes that provide unique functionality not available with other tools.
This session will cover the following areas:
What is FoxISAPI?
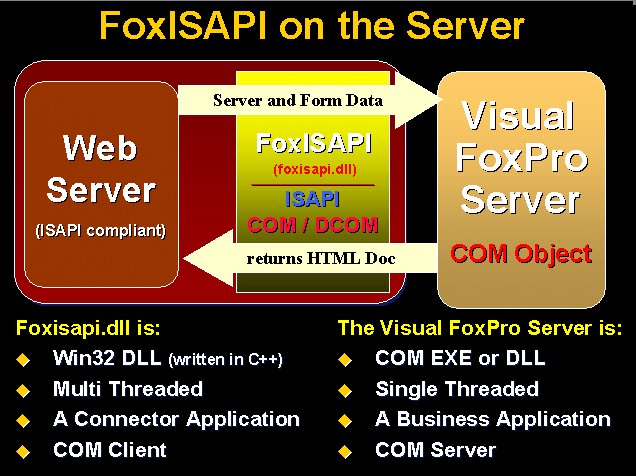
One of the tools available to build Web application with Visual FoxPro is FoxISAPI. FoxISAPI ships in the box with Visual FoxPro and is provided as a 'server' example that demonstrates how to use Visual FoxPro as a Web backend.
How it works
FoxISAPI consists of two basic components which are required to make it tick: The FoxISAPI.dll and your implementation code created as a Visual FoxPro COM object:
When the browser makes a request on the Web server it asks to load FoxISAPI.dll via a URL
link very much like this:
http://someserver.com/scripts/foxisapi.dll/YourServer.YourClass.YourMethod
This causes the Web server to load FoxISAPI into its memory space. Since Foxisapi.dll is a
Win32 DLL it loads once and then stays loaded in the calling process of the Web server for
the duration of operation. The DLL is also multi-threaded which means it can take multiple
simultaneous requests from the multi-threaded Web server – if 10 people request the
same URL that takes 10 seconds to process you can have 10 threads asking to access your
COM object. Unfortunately, Visual FoxPro is single threaded and cannot walk and chew gum
at the same time, so in its default implementation foxisapi.dll will have to queue these
incoming requests. However, FoxISAPI includes a pool manager which we'll look at later on
to manage multiple simultaneous instances of the COM objects to make it possible to run
requests concurrently.
Once loaded the Foxisapi.dll now goes ahead and tries to create an instance of the COM object specified on the URL – Yourserver.YourClass - by issuing the equivalent of:
o=CREATEOBJECT("YourServer.YourClass")
o.YourMethod("FormVar1=Test+Value","c:\http\foxisapi\XXX.ini",0)
For this to work the OLE server must exist and be registered in the Windows Registry in order for FoxISAPI to be able to create the object from the Class ID passed on the URL command line. If you look back on the URL you'll see that all three pieces of the server - the server, class and method - are described with the YourServer.YourClass.YourMethod text in the above link following the DLL name with a slash (this is known as the Physical path) in order to allow the two above commands to be described as a single string.
At this point FoxISAPI.DLL has created an instance of your COM server and has called your method in this server. FoxISAPI is smart enough to load an instance of this server and then keep the reference to this server loaded. This means that the first hit on the server will be slow as the entire VFP runtime loads into memory, but any subsequent hits are very fast as they access a server that is already loaded in memory.
Build your application code with Visual FoxPro
What happens next? Essentially you now have received a blank check from the Web server to go wild and run Visual FoxPro through its magic paces. You can now run any queries, inserts, access remote data, call classes and business objects if you choose - all of Visual FoxPro is available to you.
Well, not all of it actually. You can' run any interactive code that requires user intervention. You can't run a form or even pop up a dialog box to have a user start entering data. By the time the request reaches your FoxPro code you're essentially looking at building a one-way transaction based request handler. The Web server is waiting for a single response from your code in the form of a complete HTML document. There's no interactivity happening at this point. All of your user interface needs to be generated as HTML that is sent back as the character return value from your COM server method.
Any attempt to call an interactive form or dialog will cause the server to hang. It's very important to understand this! Any prompt in your code whether voluntary (forms, MessageBox etc) or involuntary (a File Open dialog, a program error) will cause your server to hang and no longer be available to serve requests!
Once your code is complete it needs to return a string back to the FoxISAPI.DLL as the return value. This string must contain HTTP compliant output. In most cases this output will be an HTML document, but a number of other responses such as a redirect, request for authentication, or an error result can also be
Building the COM Server
Let's take a look what a FoxISAPI compliant COM server looks like in terms of FoxPro code. You might be surprised that a 'Hello World' application with FoxISAPI takes less than 10 lines of code! Here's what the most basic FoxISAPI compatible COM server that you can build looks like:
*** System Defines
#DEFINE CR CHR(13)+CHR(10)

DEFINE CLASS TFoxISAPI AS Custom OLEPUBLIC

FUNCTION Helloworld
LPARAMETER lcFormVars, lcIniFile, lnReleaseFlag
LOCAL lcOutput

*** HTTP header - REQUIRED on each request!

lcOutput="HTTP/1.0 200 OK"+CR+;
         "Content-type: text/html"+CR+CR

lcOutput=lcOutput+;
   "<HTML><BODY>"+CR+;
   "<H1>Hello World from Visual FoxPro</H1><HR>"+CR+;
   "This page was generated by Visual FoxPro...<HR>"+CR+;
   "</HTML></BODY>"

RETURN lcOutput


ENDDEFINE
If you take this code above, stick it into a PRG file, add it to a project and compile
it as an EXE or DLL based COM server you will be able to call the server from your Web
browser simply by typing:
/localhost/scripts/foxisapi.dll/TFoxServer.TFoxIsapi.HelloWorld
into the browser's location window. Who said Web development has to be difficult?
The above code is pretty simple and doesn't do anything fancy, but it demonstrate most of the key pieces that each method that is called from a Web link must support. First off the class created must be created as OLEPUBLIC in order to be accessible as an COM object once compiled. Note that you can use a single server that contains multiple publicly accessible classes. We'll talk more about that in a minute but first let's see how to configure your server properly for operation.
Server Configuration
Once you've build your Automation server the next step is to properly configure it to run on the Web server. You should make a point of always including a very basic request in your server, so that you can easily test operation of it through the Web page without fear of potentially causing an error. More on error handling later, but the best thing to do is to include a very simple method which simply takes three parameters and returns a string:
Procedure ServerTest

LPARAMETER lcFormVars, lcIniFile, lnRelease

RETURN "<HTML>FoxISAPI Test Request</HTML>"
You'll see in a moment why this is useful. The first step is to test your server inside of Visual FoxPro as a native class:
o=CREATE("TfirstServer")

? o.ServerTest()
You can also do this with other simple requests. If you need some form variables to to work with you can simulate URL encoding manually. For example:
o=CREATE("TfirstServer")

? o.ServerTest("Name=Rick+Strahl&Company=West+Wind+Technologies")
and so on. It'll get tedious quickly with more than a few parameters, but it's a good idea to test forms inside of VFP first before building them into COM objects which can't be interactively debugged as they are EXE files.
Build the Server as an OutOfProcess EXE server
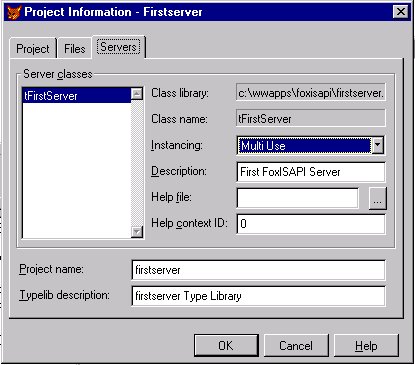
Next, build your server into an OutofProcess EXE COM object. For example:
BUILD EXE FirstServer FROM FirstServer RECOMPILE
or you can use the project manager. Make sure that the class you're going to call from the Web page has the OLEPUBLIC flag set (if you're building a visual class or the OLEPUBLIC keyword if you're doing it in code).
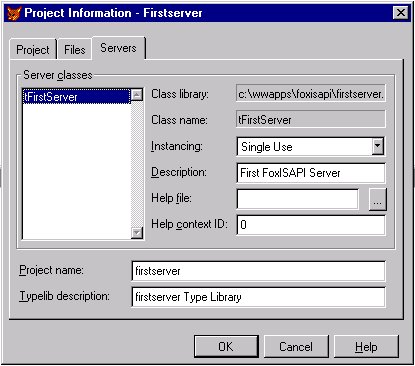
Then check for operation of your server as you did with the native class, but use the COM ProgId for the server's creation:
o=CREATE("FirstServer.TfirstServer")

? o.ServerTest()
You should see the result from that method just as you did before. Notice that this is a COM object that you can now see in Task Manager, showing as FirstServer.EXE.
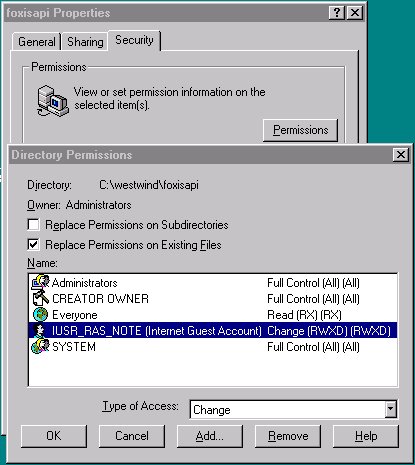
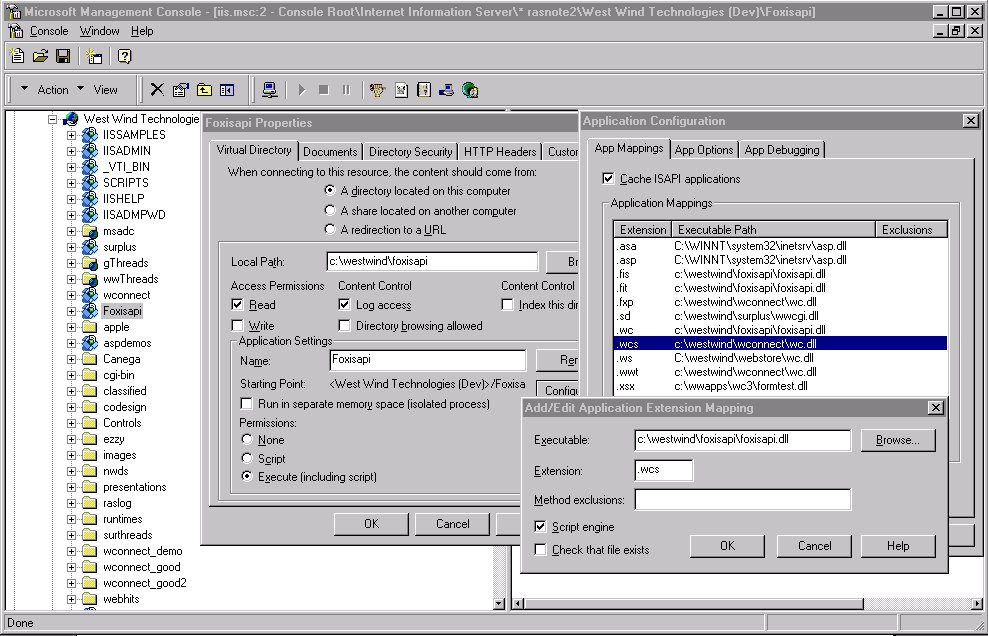
Copy FoxISAPI.dll into a Web script directory
In order to call Foxisapi.dll from a Web page it needs to be accessible to the Web server in a directory that has Execute rights set. You can use the Web server's default script directory or create a new virtual directory (as I do usually) and set execute rights on it:

You'll also want to copy FOXISAPI.INI into this directory. It contains various configuration information about how FoxISAPI runs.
In order for foxisapi.dll to create the INI files in this directory you should also give CHANGE rights to the IUSR_ account using the NT Explorer:
Run DCOMCNFG to configure your server
And now for the fun part – NOT! In order to properly run your COM object inside of IIS, you need to configure it for the proper Impersonation of an NT User account. Without this Impersonation your server will run under the IIS default user account called IUSR_MachineName where machine name will be your machine's actual name. Mine is IUSR_RAS_NOTE as you can see in the Security dialog above.
Problem is that this account has next to no rights on your machine, meaning you most likely will not be able to access your data files, ODBC connections, INI files or most anything else that's not directly in a Web root.
To get around this problem a process called Impersonation can be used on EXE based COM objects using a utility called DCOMCNFG. There are two settings you should make – global settings and settings for your individual server.
Global default settings allow you to configure all servers for default launch and access rights. These rights determine whether a given NT account will have the rights to launch and access your server. I'm not sure why you'd want to separate these options – launching and not accessing would be kind of silly – but you have to set both launch and access rights:
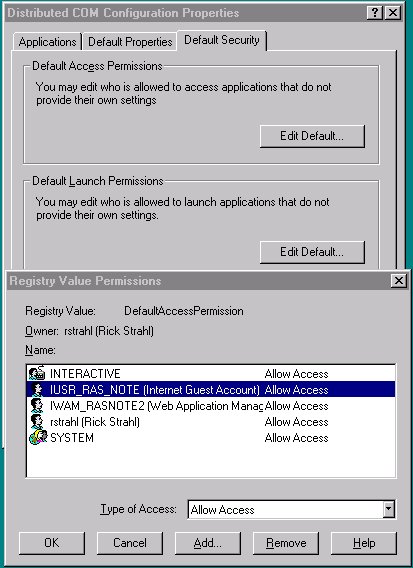 Set up the IUSR_ account in this fashion for both the Default
Access and Default Launch Permissions. You can also configure this option directly on your
specific server, but I prefer to do it here, so I don't have to worry about it for each
server I build.
Set up the IUSR_ account in this fashion for both the Default
Access and Default Launch Permissions. You can also configure this option directly on your
specific server, but I prefer to do it here, so I don't have to worry about it for each
server I build.
The next step is to configure the individual server. Click on the Applications tab, then find the name of your server (VFP Default) or the descriptive name you gave the server in the project manager. Note that you are looking for the 'Class' name, rather than the EXE (Server) name. Also note that if you have multiple classes in the same server only one of the entries will show – usually the first one in the project manager.
For the individual server you'll want to configure the Impersonation:
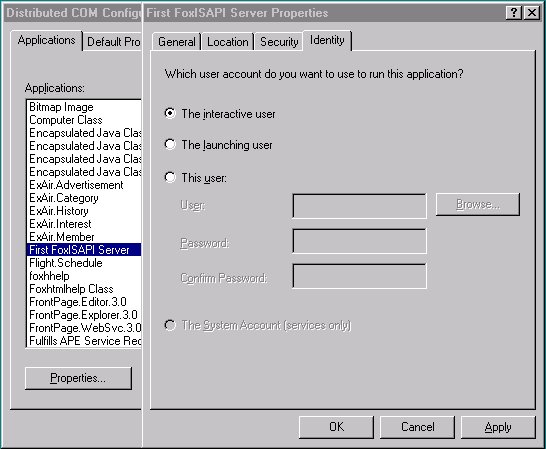
By setting the Impersonation level to the 'Interactive User' you are telling COM to use whoever is logged on currently or the SYSTEM account if noone's logged on to be the controlling account for your COM object. So if you're logged on as an Administrator that's the account the server will use.
Note:
Updated in VFP 6.0:
Visual FoxPro 6.0 no longer blows away the DCOMCNFG registry settings as VFP 5.0 did everytime you rebuilt your project. Unless you rename your servers or you explicitly tell them to Generate new ClassIds when building, the settings you make in DCOMCNFG on a particular server remain intact after each rebuild.
COM Server Instancing
In the previous section I discussed server configuration based on building EXE components, rather than InProcess servers. That's because of the way FoxISAPI is designed – it works best with Out of Process components as these can be efficiently pooled using FoxISAPI's internal pool manager.
InProcess COM Objects
Out of Process COM Objects
In my own work, I rarely use InProc servers with FoxISAPI, because frankly it's a
hassle and I've found it to be rather unstable. At the writing of these notes VFP 6.0 is
still in beta and some of the InProc features of VFP 6.0 like concurrent method calls are
not working resulting in blocking for multiple servers making scalability iffy. This will
be fixed by the time VFP 6 ships, but it points to the complexity of this issue, which is
bypassed with the FoxISAPI pool manager and EXE servers entirely. Out Of Process servers
have been working great since VFP 5.0 and the overhead in calling the EXE is so minimal
that in most situations there's no reason to take a chance on DLL servers.
Building FoxISAPI Requests
Ok, now you have a good idea on how to create and call a basic FoxISAPI server. Now lets take it step by step and create a few requests. I'll show you how to use a framework that will simplify you're life dealing with the repetitive code that's used on almost every request, so we can start focusing on running the business logic we're trying to show on the Web.
When FoxISAPI calls your COM server it passes along 3 parameters to each request method that is called. While you might not need to do anything with these parameters, your method must support these three parameters or else an COM Server error will be raised when the method is called.
[FOXISAPI]
Request Method=GET
Query String=UserId=11111&UserName=Rick+Strahl
Logical Path=/wwDevcon.TFoxIsapi.TestMethod
Physical Path=c:\westwind\wwDevcon.TFoxIsapi.TestMethod
FoxISAPI Version=FoxISAPI v1.1
Request Protocol=HTTP/1.0
Referer=/cgi-win/foxisapi.dll
Server Software=Microsoft-IIS/2.0
Server Name=rasnote
Server Port=80
Remote Host=111.111.111.113
Remote Address=111.111.111.113
[ALL_HTTP]
HTTP_ACCEPT=image/gif, image/x-xbitmap, image/jpeg, image/pjpeg, */*
HTTP_ACCEPT_LANGUAGE=en
HTTP_CONNECTION=Keep-Alive
HTTP_HOST=rasnote
HTTP_REFERER=http://rasnote/devcon/
HTTP_UA_PIXELS=800x600
HTTP_UA_COLOR=color8
HTTP_UA_OS=Windows NT
HTTP_UA_CPU=x86
HTTP_USER_AGENT=Mozilla/2.0 (compatible; MSIE 3.01; Windows NT)
HTTP_COOKIE=WWLASTVISIT=10/20/96; DENALISESSIONID=PUWFKVSKIVSVQCVG
[Accept]
image/gif=Yes
image/x-xbitmap=Yes
image/jpeg=Yes
image/pjpeg=Yes
*/*=Yes
[SYSTEM]
GMT Offset=-28800
Typically you'll use only a few of the keys from the INI file. The Query String is
frequently read to figure out what 'parameters' where passed to a form. The User Agent
can help you to determine whether the user's setup allows you to show browser specific
features. The Referer tells where the user was coming from - HTTP_REFERER contains
the link the user clicked on to arrive at the current location. HTTP Cookies can be
retrieved using a Browser stored ID that you can use to track a user over several requests
through a site.
Once your code gets control you can use VFP as you see fit to run queries or run any other kind of transaction or logic operation using FoxPro code. The end result of each exit point of your method must be an HTTP compliant string.
In most cases the output will be an HTML document, but you have to be sure to add an HTTP header to the top of it. Typical HTML output should look like this:
HTTP/1.0 200 OK
Content-type: text/html

<HTML>
<H1>Hello World</H2>
</HTML>
The HTTP header and Content-type are important since not all browsers will support
headerless results. Leaving of the header can result in a 'Invalid Response' error on the
browser. Note each line of the header must be separated by a CHR(13)+CHR(10) and the final
header line must be followed by a blank line containing only the CHR(13)+CHR(10).
While you will almost always return an HTML document it's possible to generate standard HTTP header responses as well. For example, if you wanted to cause Authentication to occur you might return:
HTTP/1.0 401 Not Authorized
WWW-Authenticate: basic realm=west-wind.com

<HTML>
Get out and stay out!!!
</HTML>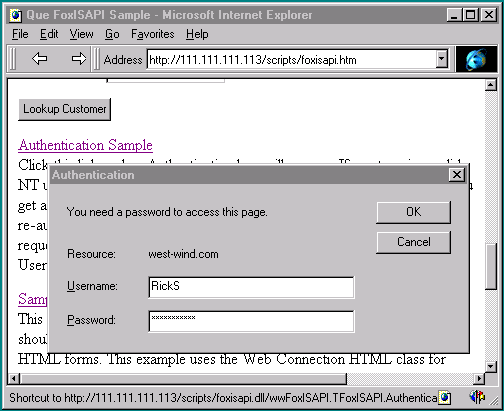
An authentication box that was initiated from a Web request forces authentication against the NT user/security manager if Basic Authentication is enabled in the Web server.
This would cause an authentication box to be thrown up by the browser unless the user accessing the link was previously authenticated. If the user was not authenticated the password box pops up. If the user types in an invalid password an error message is returned, otherwise the same link is re-executed and the now validated user can get passed the password check. You can then check the password entered as passed back in a the Authenticated Username CGI variable to determine whether to allow the user in (actually NT will first authenticate the user and fail if the user is not valid as per the User Manager).
Here's what this looks like in code (using some of the methods described in the next
section):
lcUserName=THIS.ServerVariables("Authenticated Username")

IF EMPTY(lcUserName)
    *** Send Password Dialog
    lcOutput=;
      "HTTP/1.0 401 Not Authorized"+CR+;
      "WWW-Authenticate: basic realm=west-wind.com"+CR+CR+;
      "<HTML>"+CR+;
      "Get out and stay out!!! "+CR+;
      "</HTML>"+CR

    RETURN lcOutput
ENDIF

*** Go on processing - user has been authenticated
...
RETURN lcOutput
We'll discuss more examples of wwFoxISAPI class implementation later on, but now lets deal with the remainder of installation of your servers.
Another Simple Example
Here's another simple example that retrieves some data from a table and returns the output as a string:
FUNCTION FirstQuery
LPARAMETER lcFormVars, lcIniFile, lnReleaseFlag

lcIniFile=IIF(type("lcIniFile")="C",lcIniFile,"")

*** Don't release the server
lnReleaseFlag=0

lcOutput="HTTP/1.0 200 OK"+CR+;
         "Content-type: text/html"+CR+CR

SELECT  Company, Careof, Address, custno, phone ;
   FROM (".\data\TT_CUST") ;
   ORDER BY COMPANY ;
   INTO Cursor TQuery


lcOutput = lcOutput + ;
  [<HTML><BODY BGCOLOR="#FFFFFF">] + ;
  [<H1>Customer Lookup</H1><HR>] + ;
  [Matching found: ]+STR(_Tally)+[<p>]

lcOutput = lcOutput + ;
   [<TABLE BGCOLOR=#EEEEEE CELLPADDING=4 BORDER=1 WIDTH=100%>]+CR+;
   [<TR BGCOLOR=#FFFFCC><TH>Name</TH><TH>Company</TH><TH>Address</TH></TR>]+CR

SCAN
   *** Build the table row - note the second column is hotlinked by CustId for display
   lcOutput = lcOutput + [<TR><TD>]+;
          TRIM(IIF(EMPTY(TQuery.Careof),"<BR>",Tquery.CareOf))+[</TD><TD>]+;
          TRIM(IIF(EMPTY(Tquery.Company),"<BR>",TQuery.Company))+[</a></TD><TD>]+;
          TRIM(IIF(EMPTY(Tquery.Phone),"<BR>",STRTRAN(TQuery.Phone,CHR(13),"<BR>")))+[</TD></TR>]+CR
ENDSCAN

lcOutput = lcOutput  + [</TABLE><HR>] + ;
                       [</BODY></HTML>]

USE IN Tquery
USE IN TT_Cust

RETURN lcOutput
which generates an HTML table like this:
Now the problem with the above request is that it doesn't interact with the Web page at
all. We're simply running a query, but we're not parameterizing that query in any way. Up
to now I haven't shown the tools to decode the form variables and perform some basic HTML
generation automatically. Read on.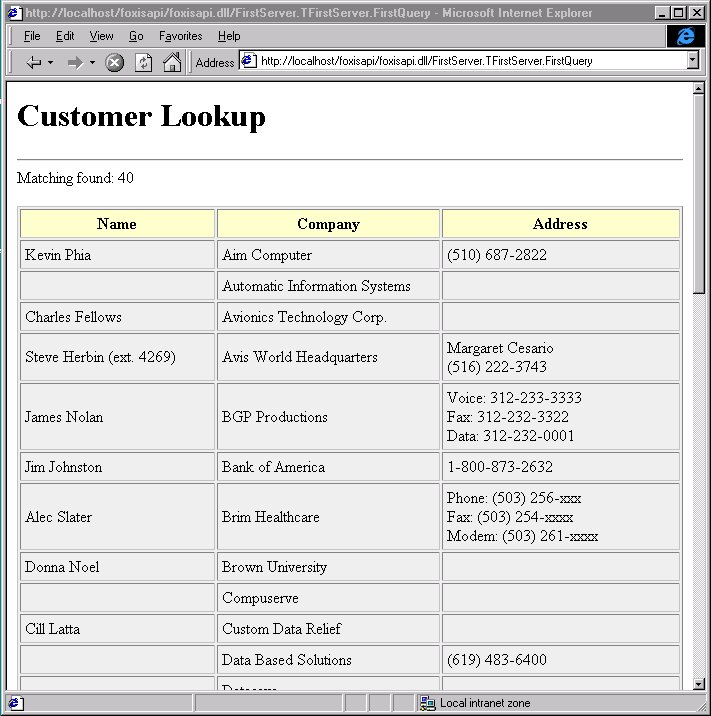
The next step – a basic framework
The first thing you notice when you look at the code for the last request is that there's a lot of stuff going on that has very little to do with the business logic of what you're trying to accomplish. You'll find that lots of things are rather repetitive and need to occur on every request. Adding an HTTP header to a request, parsing form variables (which we haven't done yet), sending error messages that are standard pages.
So, let's introduce a framework here. This framework is included here courtesy of West Wind Web Connection and provides a small subset of that Web application framework.
Why do you need a framework?
The wwFoxISAPI framework
This framework is fairly simple and straight forward. It consists of three objects:
wwFoxISAPI
The server object that you subclass your FoxISAPI apps from.
wwRequest
Member object of wwFoxISAPI handles retrieval of Form and Server Variables to allow
you to use information provided by the user and the Web server in your requests.
wwResponse
Member of wwFoxISAPI handles output of all HTML/HTTP.
wwFoxISAPI
This class represents the basic server object which is also a container for the wwRequest and wwResponse objects. The following methods and properties exist.
Property |
What it does |
| oRequest | Instance of a wwRequest object used for retrieving HTML Form and server variables. |
| oResponse | Instance of wwResponse. Used for all output to be sent back to the Web server. |
| lError | Flag that determines whether an error occurred |
| cErrorMsg | If lError is .T. this contains an error message |
Method |
What it does |
| Process() | Entry point method that provides an entry point
for every request of the server. Optionally called, but recommended to centralize
access! Set Method = on the URL. Pass: <cFormVars>, <cIniFile>,
<nRelease> |
| StartRequest() | Method that configures the oRequest and oResponse
members from the current request input data. Pass: <cFormVars>, <cIniFile>,
<nRelease> |
| StandardPage() | Simple HTML page generation method. Creates a
fully functional page from a header and body parameter. Pass:
<cHeaderText>,<cBodyText> |
| ErrorMsg() | Same as StandardPage, but implemented to allow for
showing error message differently than standard pages. Pass:
<cHeaderText>,<cBodyText> |
| Error() | Internal, protected error handler method. Important. Calls ErrorMsg() to generate an error response and turns off further output. |
wwRequest
This class handles access to the input that's made available by the Web server. This includes access to HTML Form variables, the Query String and Server Variables. This object is configured on each call by calling wwFoxISAPI::StartRequest which sets the cContentFile and cFormVars properties
Property |
What it does |
| cFormVars | Used to hold the HTML form variables for parsing. |
| cContentFile | The name of the INI file that holds all server variables. |
| cQueryString | The full Query String as passed on the URL. This is everything following the ? on the URL. |
Method |
What it does |
| LoadRequest() | Initializes the request. This method is called
from wwFoxISAPI::StartRequest. Pass: <cFormVars>,<cIniFile> |
| Form() | Returns an individual HTML Form variable entered
by the user. Pass: <cFormVarName> |
| QueryString() | Returns named parameters of the Querystring. Pass:
<cQueryStringKey> or <nPositionalParameter> |
| ServerVariables() | Returns any of the server variables available in
the INI file. See the INI file listing above for details on what keys are available. Pass: <cServerVarKey>,[<cSection>("FoxIsapi")] |
| GetFormMultiple() | Returns a multivalue HTML form variable into an
array. Pass: <@aFormVars>,<cFormVarName> |
| SetKey() | Forces a form variable to be set to a new value.
Used for overriding values on auto updates. Pass: <cFormVar>, <cValue> |
| aCGIParms() | Creates an array of positional parameters separated by ~'s. For compatibility with Web Connection and the optional positional parameter scheme. Parses into Protected aCGIParms property. |
| GetCGIParameter() | Returns a positional parameter. You can also use QueryString(nValue) for this, but only after you've called aCGIParms! |
| GetAuthenticatedUser() | Returns the REMOTE_USER environment variable. User that's logged on to NT on the server |
| GetPhysicalPath() | Returns the name of the script. Note: this doesn't work correctly for Foxisapi.dll but it works with script maps. Use this to retrieve the path to a script for template expansion. |
| GetLogicalPath() | Returns the virtual path to a script mapped document. Again, doesn't work with Foxisapi.dll but works with script mapped docs mapped to it. |
| GetPreviousUrl() | Returns the URL that called this document. If the user typed the URL manually this value will be blank. |
| GetBrowser() | Return the browser's full name |
| IsLinkSecure() | Returns .t. if the link is secure. Pass a server as a string if the port is different from 443 (standard SSL port). |
| GetCookie() | Retrieves an HTTP Cookie. |
| GetRemoteAddress() | Retrieve the client's IP address |
| GetServerName() | Name of the server's domain or ip as specified on the client's URL |
wwResponse
This class is responsible for creating output for the Web application. All output should flow through the Write or Send methods of this class in order to properly handle output to different output sources as well as error response handling that allows turning off of output after an error has occurred and an error message was generated.
Property |
What it does |
| cOutput | Property that holds the cumulative HTTP (mostly HTML) output. |
| lNoOutput | When .t. any request for output doesn't write to the output source. Typically used after an error occurred to prevent further output to occur after an error message |
Method |
What it does |
| Write Send() |
Low level output methods that can be called
directly and are used internally by all framework functions to send output to the output
source. If lNoOutput is .T. output is not sent to the output source, but rather returned
as a string. All internal methods call Send or Write and return the result to the user
– most methods also support the lNoOutput parameter with the same result. Pass:
<cText>,<lNoOutput> |
| Rewind() | Clears all output and resets the lOutput flag |
| SendLn() | Just like Send or Write but appends a Carriage Return for easier source formatting. |
| GetOutput() | Returns the cumulative output. Doesn't clear the cOutput property. |
| ContentTypeHeader() | Creates a full Content Type Header Pass:
<cContentType (text/html)>, <lNoOutput> |
| HTMLHeader() | Creates a header for a document. Header includes
ContentType Header, title, large text header and background formatting. Pass:
<cHeaderText>, <cTitle>, |
| HTMLFooter() | Inserts end BODY and HTML tags into the document.
Also, allows you to put some attach some extra HTML prior to the end tags. Pass:
<cFooterText>, <lNoOutput> |
| Authenticate() | Create a request for Authentication that pops up a
login dialog on the client. Pass: <cDisplayServerName>, <cErrorHTML>,
<lNoOutput> |
| ExpandScript() | Takes an input file and expands the text using
program based evaluation. The page is converted into a TEXTMERGE program that's run by VFP
(in compiled mode) or by CodeBlock (interpreted mode). Pass: <cPage>,
<nMode>, <lNoutput> nMode switches: |
| ExpandTemplate() | Takes an input filename and expands the text using
expression based evaluation and Codeblocks. Unlike scripting this mechanism does not
support control structures in the HTML page except in distinct CodeBlocks. Pass:
<cPage>, <lNoOutput> |
Looks like a lot of stuff, huh? But it sure makes life easier. Let's take a quick look at the examples we previously ran with the framework now.
DEFINE CLASS TFirstserver AS Custom OLEPUBLIC

FUNCTION Helloworld2
LPARAMETER lcFormVars, lcIniFile, lnReleaseFlag
LOCAL lcOutput

THIS.StartRequest(lcFormVars, lcIniFile, lnReleaseFlag)

THIS.StandardPage("Hello World From Visual FoxPro",;
                  "This page was generated by VFP at" +time())

RETURN THIS.oResponse.GetOutput()

ENDDEFINE
This reduces the Hello World program down to 3 lines of code and not having to remember arcane syntax for the HTTP header. Note the RETURN value: We're returning the HTML output of the oResponse object back to the client. Standard page writes output to the oResponse object so even though we didn't access the response object directly it was used for output and hence we have to return its content back to the client. You'll want to call THIS.oResponse.GetOutput() on every exit point of your request.
Let's take a look at the data request we wrote before and embellish a little bit by allowing it to be 'parameterized' with a query string option to pick an individual customer and show each customer as a link so we can view the detail by calling another FoxISAPI request. The URL to access the list page may look like this:
/foxisapi.dll/FirstServer.TfirstServer.LookupCustomer?CustNo=10
FUNCTION SimpleQuery
LPARAMETER lcFormVars, lcIniFile, lnReload
LOCAL lcCustno
PRIVATE Response

THIS.StartRequest(lcFormVars, lcIniFile, lnReload)

lcCustno = THIS.oRequest.QueryString("CustNo")

*** If no custno was passed let's show all custs
IF !EMPTY(lcCustNo)
   lcCustno = PADL(lcCustNo,8)
ENDIF

*** Easier reference
Response = THIS.oResponse

*** NOTE THE USE OF THE PATH!
SELECT [<A HREF="/foxisapi/foxisapi.dll/FirstServer.TFirstServer.LookupCustomer?Custno=]+ALLTRIM(Custno)+[">]+Company+[</a>] as COMPANY,;
       CareOf, phone, custno, company as sort ;
 FROM .\Data\TT_Cust ;
 WHERE CustNo = lcCustNo ;
 ORDER BY Sort ;
 INTO Cursor TQuery

IF _TALLY = 0
   THIS.ErrorMsg("No customers match the customer number.",;
                 "Please retry your request or omit the "+;
                 "customer number for a list of all customers.<p>"+;
                 [<A HREF="]+THIS.oRequest.GetPreviousUrl()+;
                 [">Return to the previous page</a>])
   RETURN Response.GetOutput()
ENDIF

*** Creates ContentTypeHeader and HTML header
Response.HTMLHeader("Simple Customer List")

Response.Write([<TABLE Border=1 CellPadding=3 width="98%">] + ;
 [<TR BGCOLOR="#CCCC88" ><TH>Company</TH>]+;
 [<TH>Name</TH><TH>Phone</TH></TR>])

SCAN
  Response.Write("<TR><TD>" + Company + "</TD><TD>" + Careof + ;
                 "</TD><TD>"+ STRTRAN(Phone,CHR(13),"<BR>") +;
                 "</TD></TR>")

ENDSCAN

Response.Write("</TABLE>")

RETURN Response.Getoutput()
ENDFUNC
Pretty straightforward. Again, note the call to StartRequest to configure the oRequest and oResponse member objects. We use the Request.QueryString() method to retrieve the customer number and use it in the query to retrieve the appropriate customer. If no customer was supplied we'll display the full list instead.
Also, note how the HREF links are embedded into the page: The SQL statement actually creates the links as part of the result cursor. When the time comes to display these items we don't have to worry about reformatting it – it's faster in the SQL statement since the expression evaluates only once for the query.
As before, Response.GetOutput() is used to return the HTML back to the client. Notice that there's an error check if no records are returned from the query. It creates an error message and then also returns the Response Output!
Since the link is embedded into the page, lets show the record display as well:
FUNCTION LookupCustomer
LPARAMETER lcFormVars, lcIniFile, lnReload
PRIVATE Response

THIS.StartRequest(lcFormVars,lcIniFile,lnReload)

Response = THIS.oResponse

lcCustId = THIS.oRequest.QueryString("Custno")
lcCustId = PADL(lcCustId,8)

IF !USED("TT_Cust")
   USE .\Data\TT_Cust IN 0
ENDIF
SELE TT_Cust

LOCATE FOR CustNo = lcCustId
IF !FOUND()
   THIS.ErrorMsg("Customer does not exist","["+lcCustId+"] Please select a valid customer.")
   RETURN Response.GetOutput()
ENDIF

Response.HTMLHeader(Company)

Response.Write([<TABLE BORDER="1" CELLSPACING="3" width="300">])
Response.Write("<TR><TD>Company:</td><TD>"+Company + "</TD></TR>")
Response.Write("<TR><TD>Name:</td><TD>"+Careof + "</TD></TR>")
Response.Write("<TR><TD>Phone:</td><TD>"+Phone + "</TD></TR>")
Response.Write("<TR><TD>Address:</TD><TD>"+STRTRAN(Address,CHR(13),"<BR>") + "</TD></TR>")
Response.Write("</TABLE>")

RETURN Response.Getoutput()

ENDFUNC
Error Handling
I haven't talked much about error handling, but one crucial aspect of Web Applications is what to do if an error occurs. If an error occurs and the server pops up a dialog box your server is dead in the water and hung. This is something that must be avoided at all costs.
One of the things the framework does is use an Error method in the wwFoxISAPI class. The error method looks like this:
#IF NOT DEBUGMODE

***********************************************************************
* wwFoxISAPI :: Error
*********************************
***  Function: Limited Error handler. Not much we can do here other
***            than exit. Displays error page.
***********************************************************************
PROTECTED FUNCTION Error
LPARAMETERS nError, cMethod, nLine
LOCAL lcOutput

THIS.lError = .T.
THIS.cErrorMsg = THIS.cErrorMsg + STR(nError) + " - " + Message() + " - " + Message(1) + " - " +cMethod + " @ " + STR(nLine) + CHR(13)

THIS.StandardPage("Hold on... we've got a problem!",;
                  "The current request has caused an error.<p>"+CR+;
                  "Error Number: "+STR(nError)+"<BR>"+CR+;
                  "Error: "+Message()+"<BR>"+CR+;
                  "Code: "+Message(1)+"<BR>"+CR+;
                  "Running Method: "+cMethod+"<BR>"+CR+;
                  "Current Code Line: "+STR(nLine) )

THIS.oResponse.SendLn("<HR>")

*** Stop further output
THIS.oResponse.lNoOutput=.T.

RETURN TO Process
ENDFUNC
* Error

#ENDIF
Since the wwFoxISAPI class (or your subclass of it really) is at the top of the call stack its error method will capture any error that occurs and is not handled by a local class error. This is useful as we can capture the error and report it in the form of an error message that contains error information. You can also log this error, but that's beyond the scope of this session here.
The important thing of the handler is to make it avoid popping up an error dialog – essentially the error is ignored and an error message generated. The code turns off further HTML output by setting Response.lNoOutput =.F. – this means if the code returns to a calling method all HTML output will not be sent to the output source, but will just be discarded.
Finally the code exits by issuing RETURN TO PROCESS. We'll discuss the Process method in the next session – it's a central entry point method that allows handling global server operations. If this method is used returning to it will cause the request to terminate immediately and cleanly and still be able to return the error message to the browser.
Centralizing your Entry point
Even as we've simplified our task through the framework there's still a lot of duplication that occurs when you look at these requests. You still have to remember to call StartRequest() on each hit and make sure that you return Response.Getouput() on all exit points. And there's the issue of cleanly handling an exit from an error.
The solution is to build your server with a centralized method, which I call Process(). Rather than calling each server method directly from the Web Page you'd always call the Process method and tell it which method you'd like to run via a QueryString parameter. You'd end up with a URL like this:
/foxisapi.dll/FirstServer.TfirstServer.Process?Method=FirstQuery
/foxisapi.dll/FirstServer.TfirstServer.Process?Method=LookupCust&CustNo=43
When called in this fashion you can now centralize your requests. The Process() method can be generic or you can override this functionality with your own, but it must at the very least handle parsing the Method querystring parameter and calling the appropriate method. Here's what the wwFoxISAPI::Process method looks like:
***********************************************************************
* wwFoxISAPI :: Process
*********************************
***  Function: Genereric Entry Point Method used for all requests.
***            This method requires that a ?Method=SomeMethod query
***            string is provided on the command line.
***            This method makes it possible to automatically load
***            the Request and Response objects automatically.
***    Assume: Always called from the Web server directly!
***      Pass: lcFormVars
***            lcIniFile
***            lnRelease
***    Return: HTML OUtput
***********************************************************************
FUNCTION Process
LPARAMETERS lcFormVars, lcIniFile, lnRelease
LOCAL lcMethod
PRIVATE Response, Request

Response=THIS.oResponse
Request=THIS.oRequest

lnRelease = 0
THIS.StartRequest(lcFormVars, lcIniFile, lnRelease)
lcMethod = Request.QueryString("Method")

DO CASE
   *** Protect against illegal method calls
   CASE INLIST(lcMethod,"PROCESS","LOAD","INIT","DESTROY")
      THIS.StandardPage("Invalid Method: " +lcParameter)

   *** Generic! Method names must be Method= on QueryString
   *** If you use different method names or parameters a custom CASE
   *** should be added *ABOVE* this line!
   ***
   *** Call methods that were specified on the command line's 1st parm
   ***  ie:   wwcgi.exe?Project~Method~MoreParameters
   CASE !EMPTY(lcMethod) AND PEMSTATUS(THIS,lcMethod,5)
      =EVALUATE("THIS."+lcMethod+"()")
ENDCASE

RETURN THIS.oResponse.GetOutput()
ENDFUNC
* wwFoxISAPI :: Process
This simple method frees you from a lot of work on each request! It automatically sets up Response and Request objects for you. Your handler methods no longer need to receive multiple parameters as they're not called directly from the Web page. Rather the EVALUATE("THIS."+lcMethod) is what calls your server method.
Remember the Error Method? It did a RETURN TO PROCESS, right? Well, let's presume there's an error in your request handler method or one of the functions/classes etc it calls that are not handled. The Error method gets control, generates the Error message to the Response object and then issues RETURN TO PROCESS, which returns to the line following the EVALUATE() in this case the RETURN THIS.oResponse.GetOutput() to still return the result output.
No matter what, THIS.oResponse.GetOutput() will always get called so you no longer have to worry about making sure that you remember to call it on all exit points of your code. You simply write to the Response object and exit and the Process method handles sending the result back to the Web server.
An additional benefit is the fact that you can now also make all of your request methods PROTECTED, so the Automation interface that your server exposes is leaner which results in a smaller footprint and faster load time. This may not matter on small servers you create, but on those that have more than 50 or so methods the load issue becomes significant.
Scripting and Templates
In order to build HTML application efficiently it's extremely important to have a mechanism available for building the display without having to write a lot of code that has to be recompiled before installation. The combination of code and scripting is an extremely powerful that can provide the maximum flexibility for your applications where you can run some code in a request method as shown above and you then use a template or a script page to actually display the output.
Implementating a scripting engine with Active Server Syntax
Let's walk through the creation of a scripting engine that will allow you use syntax similar to Active Server Pages but use FoxPro code instead of VBScript. I'll introduce two concepts here: Scripts and Templates.
Templates with MergeText
Implementing a scripting engine in VFP is actually rather simple. Both mechanisms can be created with relatively little code. Let's start with Templates. For templates I use a function called MergeText() which walks through the page loaded from a string and expands the expressions. You can find the code to MergeText in wwUtils.prg. You call it like this:
lcTextToMerge = File2Var("SomeScriptFile.FIT")
lcExpandedText = MergeText(lcTextToMerge)
Typically you'll find a file from disk and use File2Var to convert the file to a string that you can feed to MergeText to expand. Inside of a template you can use the following syntax:
<%= AnyFoxExpression %>
<% BlockOfCode %>
Expressions are evaluated and embedded directly and can be of any type that but Object. CodeBlocks use Randy Pearson's CodeBlk class to interpret commands sequentially. A couple of rules apply for CodeBlck:
CodeBlk is interpreted using Macro Expansion for each line of code and can be very, very slow for iterative looped commands, so use it sparingly. If you find yourself creating more than a few lines of code within a code block, write a UDF as part of your application instead and use an expression to call it instead:
<%= CreateListTable() %>
Note that you can do things like this:
<% PUBLIC o
   o=CREATE("SomeClass")
%>

Some HTML here…

<%= o.ShowHTMLTable() %>
<% RELEASE o%>
Here's an example of request you might want to run using a template. You may have a
snippet of code that does this:
PROCEDURE ShowCustomer

lcCustno = Request.QueryString("CustNo")
USE TT_CUST
LOCATE FOR CUSTNO = lcCustNo
IF !FOUND()
   THIS.ErrorMsg("Customer Not Found")
   RETURN
ENDIF

Response.ContentTypeHeader()

Response.ExpandTemplate("c:\westwind\Foxisapi\Customer.wc")

ENDPROC
The HTML template in customer.fit (Web Connection Template) then looks like this after setting it up in FrontPage:
<html>

<head>
<meta NAME="GENERATOR" Content="Microsoft Frontpage 3.0">
<meta HTTP-EQUIV="Content-Type" content="text/html">
<title>Document Title</title>
</head>

<body>

<table width="400">
  <tr>
    <td bgColor="#ffffcc" vAlign="top" width="212"><strong><font face="Arial">Company</font></strong></td>
    <td width="180"><strong><font face="Arial"><%= Tquery.Company %> </font></strong></td>
  </tr>
  <tr>
    <td bgColor="#ffffcc" vAlign="top" width="212"><strong><font face="Arial">Name</font></strong></td>
    <td width="180"><strong><font face="Arial"><%= CareOf %> </font></strong></td>
  </tr>
  <tr>
    <td bgColor="#ffffcc" vAlign="top" width="212"><strong><font face="Arial">Phone</font></strong></td>
    <td width="180"><strong><font face="Arial"><%= STRTRAN(Phone,CHR(13),"<BR>") %> </font></strong></td>
  </tr>
<% IF TQuery.Billrate > 0 %>
  <tr>
    <td bgColor="orangered" width="212"><strong><font face="Arial">Billable Customer at $<%= BillRate %></font></strong></td>
  </tr>
<% ENDIF %>
</table>
</body>
</html>
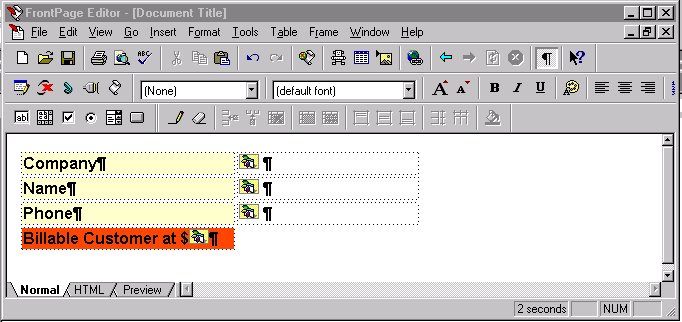 Note that in FrontPage all the expressions show up as script
tags. Since MergeText uses ASP syntax FrontPage and most other HTML editors will treat
these FoxPro script tags as if they were native Active Server tags. For example in Visual
Interdev the tags are highlighted as code just as with VBScript and most keywords even
show up in the proper syntax color highlights.
Note that in FrontPage all the expressions show up as script
tags. Since MergeText uses ASP syntax FrontPage and most other HTML editors will treat
these FoxPro script tags as if they were native Active Server tags. For example in Visual
Interdev the tags are highlighted as code just as with VBScript and most keywords even
show up in the proper syntax color highlights.
You can call MergeText in your own methods or you can use the wwFoxISAPI::ExpandTemplate() or the wwResponse.ExpandTemplate() methods. The wwFoxISAPI version creates a full freestanding request including content type header, which the Response method simply sends the template right to the Response output source.
Scripting – more power and more work
Templates are very nice, but for truly free standing scripts using CodeBlk is a little too slow. While I believe the best way to build Web apps is with a combination of code and scripts/templates scripting makes it possible to do it all in a single scripted page without any code that needs to be compiled into the application.
Like Templates, Scripts use Active Server Syntax. All of the features of a template also work with scripts so you can embed expressions as well as CodeBlks. However, Scripts provide some additional functionality: They allow creation of structured statements that can mix FoxPro code and HTML. For example, the following SCAN loop will work only in a scripted page:
<HTML>
<% SELECT * FROM TT_CUST INTO Tquery
   SCAN %>
Name: <%= Company %>
<HR>
<% ENDSCAN %>
</HTML>
The reason why this works is that scripts are actually converted into full programs that are run by Visual FoxPro. The script above is converted into a textmerge document that looks something like this:
TEXT
<HTML>
ENDTEXT
  SCAN
TEXT
Name: << Company >>
ENDTEXT
 ENDSCAN
TEXT
</HTML>

ENDTEXT
The wwVFPScript class takes the original Script file and converts it into this type of TEXTMERGE code, then actually runs the code to create a temporary output file which contains the generated final HTML.
You can look at wwVFPScript for more details, but here's how the CodeBlock execution works:
***********************************************************************
* wwVFPScript :: cbExecute
**********************************
***  Function: Forces operation through CodeBlock
***      Pass: lcCode     -   Code to run as string
***            llVFPCode  -   ASP Scripting or VFP code
***    Return: Evaled output or ""
***********************************************************************
FUNCTION cbExecute
LPARAMETER lcCode, llVFPCode
LOCAL lcVFPCode

IF !llVFPCode
   lcVFPCode = THIS.ConvertPage(@lcCode,.t.)
   File2Var("Code.PRG",lcVFPCode)
ENDIF

IF llVFPCode
   THIS.RenderPageFromVar(@lcCode)
ELSE
   THIS.RenderPageFromVar(@lcVFPCode)
ENDIF

RETURN THIS.oHTML.GetOutput()
ENDFUNC
* wwVFPScript :: ExecuteCodeBlock
The ConvertPage method can convert the HTML scripting into a MergeText compatible VFP program. The code is then passed to the RenderPageFromVar() method which actually runs CodeBlk to evaluate the page. CodeBlk interprets the code 1 line at a time and is rather slow if you're doing anything inside of a loop.
You can also run a page in compiled mode. However, since COM objects are EXE files that are compiled and can't compile code on their own this option requires that you compile the pages on your own. To accomplish this you can run the following in VFP:
o=CREATE("wwVFPScript","c:\westwind\foxisapi\somepage.wcs")
o.ConvertPage()
o.CompilePage()
which creates the .WCS files into compiled .FXP files that can be run directly from disk. Or use this function in wwUtils.prg which can do it with wildcards compiling a bunch of files altogether. So you can do:
SET PROCEDURE TO wwUtils Additive
DO WCSCOMPILE WITH "c:\westwind\foxisapi\*.wcs"
The idea is that you can run scripts interactively with CodeBlk until you get it working, then compile them. Once compiled making changes requires recompiling. Since scripts are compiled they run very fast at native VFP speed.
Hooking it in…
Templates called from code is very powerful. It gives you the opportunity to call a template after you've done your processing logic and even run minimal code and expression logic inside of the HTML page.
But let's take this a step further and make it so that no code at all is required and you can fire off a scripted page automatically.
Note
In order to allow simple script and template access I had to make a very useful modification to FoxISAPI.dll. The addition of a new INI file setting called DefaultServer allows specification of a Server.Class.Method string that is used if none is supplied. For the examples above we might use:
DefaultServer=FirstServer.TfirstServer.Process
This makes it possible to create links like this:
/foxisapi/foxisapi.dll?Method=CustomerLookup
Note the lack of the 'extra path'. This change also makes it possible to create a scriptmap that calls foxisapi.dll. Scriptmaps cannot have extra paths, so the DefaultServer option makes it possible to fire off scripts automatically with syntax like this:
/foxisapi/MyScriptPage.wc
You now have a scriptmap for your DLL and it's now possible to run your script pages without having to hook any code in the COM servers you build. For example,.to run the customer lookup page from before you can now simply go:
/foxisapi/Customerlookup.wc
This call will fire up your Automation server through the script mapping and interpret that page by virtue of the logic built into the Process method of the wwFoxISAPI class. Here's how it does it:
lcPhysicalPath = Request.GetPhysicalPath()
It starts by retrieving the Physical path of the page which comes back as something like c:\westwind\foxisapi\CustomerLookup.wc. The Process method handler code checks for the .wc and wcs extensions which indicate we're running a generic script:
*** Handle Template and Script Pages
   CASE ATC(".wcs",lcPhysicalPath) > 0
      THIS.ExpandScript(lcPhysicalPath)
   CASE ATC(".wc",lcPhysicalPath) > 0
      THIS.ExpandTemplate(lcPhysicalPath)
and passes on the request to the ExpandTemplate and ExpandScript methods.
***********************************************************************
* wwFoxISAPI :: ExpandTemplate
*********************************
FUNCTION ExpandTemplate
LPARAMETER lcFileName

*** Default Content Type
Response.ContentTypeHeader()

*** And expand the actual template
Response.ExpandTemplate(lcFileName)

RETURN

************************************************************************ wwFoxISAPI :: ExpandScript
*********************************
FUNCTION ExpandScript
LPARAMETER lcFileName

Response.ContentTypeHeader()
Response.ExpandScript(lcFileName,THIS.nScriptMode)

RETURN

*wwFoxISAPI :: ExpandTemplate
These methods only forward the request to the Response object which in turn do the dirty work of evaluating these objects and then return back to the Process method which takes the output from the Response object and sends it back to the Server.
***********************************************************************
* wwResponse :: ExpandScript
*********************************
***  Function: Takes a script page and 'runs' it as a TEXTMERGE
***            document.
***      Pass: lcPage  -  Physical Path to page to expand
***            lnMode  -  1 - Interpreted (CodeBlk)
***                       2 - Compiled FXP (default)
***    Return: Nothing
***********************************************************************
FUNCTION ExpandScript
LPARAMETERS lcPage, lnMode

lnMode=IIF(EMPTY(lnMode),1,lnMode)

lcFileText = File2Var(lcPage)
IF EMPTY(lcFileText)
   RETURN THIS.Send("<h2>File " + lcPage + " not found or empty.</h2>",llNoOutput)
ENDIF

*** Add default content Type
THIS.ContentTypeHeader()

*** Create Script Object and pass THIS HTML object to it
IF lnMode = 1   && CodeBlock
	loScript = CREATE("wwVFPScript",,THIS)
	loScript.oCgi = Request

	*** Outputs to script object
	loScript.cbExecute(lcFileText)
ELSE
    loScript = CREATE("wwVFPScript",lcPage,THIS)
	loScript.oCgi = Request
	loScript.lRuntime = .T.
	loScript.lAlwaysUnloadScript = .T.

	*** Converts the name to FXP and tries run the page
	loScript.RenderPage()
ENDIF

ENDFUNC
* wwResponse :: ExpandScript

***********************************************************************
* wwResponse :: ExpandTemplate
*********************************
***  Function: Evaluates embedded expressions inside of a page
***      Pass: lcPage   -    Full physical path of page to merge
***    Return: "" or merged text if llNoOutput = .T.
***********************************************************************
FUNCTION ExpandTemplate
LPARAMETERS lcPage,llNoOutput
LOCAL lcFileText

lcFileText = File2Var(lcPage)
IF EMPTY(lcFileText)
   RETURN THIS.Send("<h2>File " + lcPage + " not found or empty.</h2>",llNoOutput)
ENDIF

RETURN THIS.Send( MergeText(lcFileText),llNoOutput)
ENDFUNC
* wwResponse :: ExpandTemplate
Multiple instances via Pool Manager
Note: You must download the latest version of FoxISAPI.DLL from the MS Web site. VFP 5.0a did not ship with the final build of this tool.
I've talked quite a bit of multiple instances of your servers. Since VFP is single threaded and the ISAPI interface is multi-threaded the only way to be able to process simultaneous requests in Visual FoxPro is to use multiple instances. In order to do so FoxISAPI and Web Connection as well use pool manager inside of the ISAPI DLL to create multiple instances of your single use EXE servers.
Be careful with multiple instances and how you instantiate them. Multiple instances can improve performance drastically on multi-processor machines, but on single processor machines they can only provide a perceived increase in speed when serving requests of varying lengths. For example, a second instance can continue to serve short requests while another instance is busy serving a lengthy query. But actual performance and load on the PC is still bound to the hardware, and two requests running simultaneously might run take twice as long as the requests would take running one after the other. Testing these scenarios is crucial for your particular application!
Figure 1.3 – FoxISAPI (and Web Connection's) Pool Managers handle instantiation and rotation of multiple servers to provide simultaneous request processing.
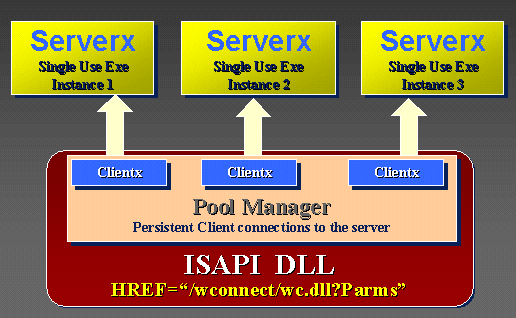
So how does it work? With multiple instances of the same server, requests are served by the pool manager, which maintains a pool of multiples of your servers. If the first instance is busy the second instance will take the request. If all servers are busy and the pool of servers is exhausted the request is queued. In order to use the internal Pool Manager the server must be single use EXE!
Multiple servers are configured via the FoxISAPI.INI startup config file:
[foxisapi]
busytimeout = 5
releasetimeout=13
statusurl = Status
reseturl= Reset
SingleModeModeUrl = SingleMode
MultiModeUrl = MultiMode

[wwFoxISAPI.TFoxISAPI]
wwFoxISAPI.TFoxISAPI=2
R_FoxIsapi.T_R_Foxisapi=1

[foxis.employee]
foxisr2.employee=2
foxisr1.employee=1
foxis.employee = 2
The first keys in the [FOXISAPI] section determine how you can manage servers. The various URL keys allow you to customize the commands used on the URL to run that command:
foxisapi.dll/status
foxisapi.dll/reset
foxisapi.dll/singlemode
The Status URL displays a list of all servers that are currently loaded. Reset releases all servers. SingleMode releases all servers but the first so you can run maintainenence operations that require EXCLUSIVE access to the data.
The actual Automation servers are configured with a separate section in FoxISAPI.INI. The section serves as a map to translate your ClassID passed on the URL to translate to the actual ClassIDs that you want to call. Since you can call both the same server or a local and remote server. Since locals and remote must have different class ids this mechanism allows you transparently to load the remote with the same URL as the local.
In the [foxis.employee] example above FoxISAPI would first load the FoxISr2 server when starting up. Once this server gets busy it would load another instance since the key value is 2. When both of these are busy foxisr1 would get loaded. Finally, a local copy gets started and two instances of that can be running before requests start queuing.
Typically, you'd want to load the local servers first, but it depends on your server load.
Configuring Remote Servers
Be careful with Remote servers. While they run reasonably fast there are a number of important issues to deal with.
Essentially, in order to build remote servers you need to make sure you build your server with some conditional logic for each location that it'll run in in order to properly point at the data and the Web Server for retrieving HTML templates.
The following issues have to be dealt with:
o=CREATEOBJECT("wcRemote.wcRemoteServer")
o.show()
[wwDemoOle.wcDemoServer]
wwDemoOle.wcDemoServer=2
wcRemote.wcRemoteServer=1
This setting will load two local servers and one remote server.
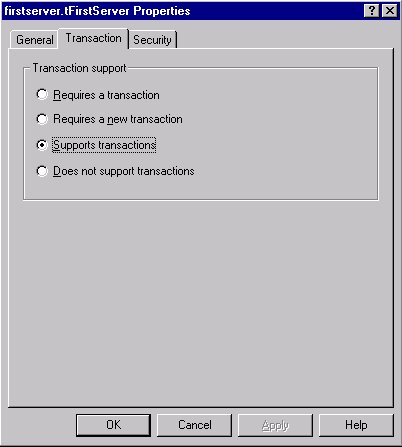
Running your FoxISAPI servers as MTS Components
There's been lots of talk about Microsoft Transaction Server support in Visual FoxPro 6.0. Sure enough MTS works with Visual FoxPro, but keep in mind that MTS will not buy you very little in terms of scalability or speed with Visual FoxPro and Web applications.
As with any server judge your use of MTS entirely by the utility that the MTS environment can provide you with. In particular:
Do not use Transaction Server with FoxISAPI if you're after the following:
If you get the idea, that I'm not a fan of MTS you're right – too much hype with not enough of the key features implemented yet. However, there are legitimate uses for MTS and I'm sure it will live up to its promise in the future when pool management is supported. If you need the features from the first list of items here's how you can integrate them into FoxISAPI.
Remember, earlier on I mentioned it was a good to have a central entry point method? Well, here's another good reason why this is useful. You can use this entry point method to handle the initialization and cleanup for every request as it relates to MTS. To do this correctly we need to do the following:
Add the following properties to the server:
*** MTS methods
lUseMTS = .T.
oMTS = .NULL.
oMTSContext = .NULL.
lMTSCompleted = .F.
lUseMTS is a global flag that determines whether MTS functions should be accessed. oMTS is the MTS COM master object to which you need a reference in order to access any of the Context object methods. In the Init add:
IF THIS.lUseMTS
   THIS.oMTS = CREATE("MTXaS.Appserver.1")
ENDIF
We can load it in the Init of the class, then update the oMTSContext object on every hit in the Process method. At the very top add:
IF THIS.lUseMTS
   THIS.oMTSContext = THIS.oMTS.GetObjectContext()
   THIS.lMTSCompleted = .F.
ENDIF
and just prior to the RETURN.
IF THIS.lUseMTS AND !THIS.lMTSCompleted
   THIS.oMTSContext.SetAbort()
ENDIF
This basically implements automatic transactions. Note that the lMTSCompleted property is checked to see whether we want to automatically abort the current transaction. The idea here is that you should manually Complete transactions as necessary. For example:
FUNCTION MTSTransaction
o=CREATE("wwSQL","DSN=MYSQL;UID=sa;PWD=")
o2=CREATE("wwSQL",DSN=OTHERSQL;UID=sa;PWD=")

IF !THIS.oMTSContext.IsCallerInRole("Manager")
   THIS.ErrorMsg("Access Denied",;
                 "You don't have access to this function")
   RETURN
ENDIF

o.Execute("INSERT CUSTOMER (company, name) values ;
         ('West Wind','Rick Strahl')")
IF !o.lError
   o2.Execute("INSERT orders (custno, total) values ;
             ('   10',120.00)")
ENDIF

*** If there was an error in either transaction - Abort
IF o.lError or o2.lError
    THIS.oMTSContext.SetAbort()
    THIS.StandardPage("Order not Updated.",;
                       o.cErrorMsg + CR + o2.cErrorMsg)
ELSE
    THIS.oMTSContext.SetComplete()
    THIS.StandardPage("Order Updated")

ENDIF

THIS.lMTSComplete = .T.

ENDFUNC
This example runs a transaction that updates two distinct servers and treats the entire transaction as one atomic unit. If any of the two fail SetAbort() is called to undo the transaction.
To test MTS you don't need to use this complex type of setup, but this is one of the few things MTS does really well. To see MTS work, you can just wrap your requests in SetComplete() calls even if no transactions are required.
The call to SetComplete or SetAbort tells MTS that the object can submit any outstanding transactions. But it also tells MTS that it can recycle this object – you don't have any state to maintain so MTS can unload it and recycle the resources. The object unloads after the call completes. Next time a call comes in MTS reloads the object. Since your client application (foxisapi) only holds a pointer to the proxy not the real object it thinks the client was there all along and is none the wiser that the object has unloaded. However, be aware there's serious overhead with this approach as the server has to be reloaded. The Init of the server refires whenever the server is reloaded.
Note the use of the oMTSComplete flag to tell the Process() method code that the appropriate Transaction method has been called already. Note that on the security check above no call to SetAbort() is necessary – the Process() method will pick it up and do it for me.
Installing the object in MTS
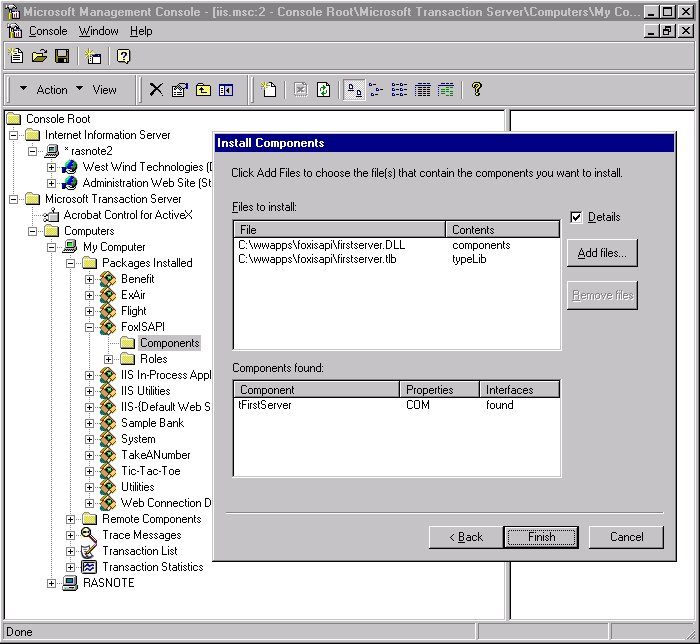
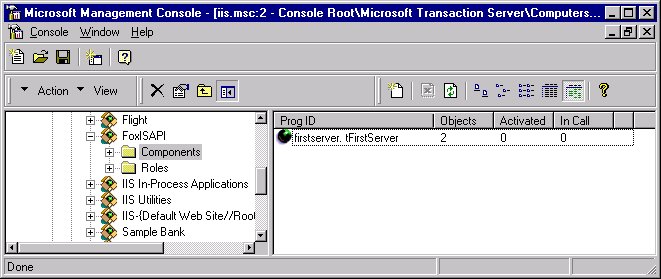 You're now ready to run the server through MTS. That's the easy
part. Just hit any of the previous requests and you should see something like this in the
MTS Explorer…
You're now ready to run the server through MTS. That's the easy
part. Just hit any of the previous requests and you should see something like this in the
MTS Explorer…
Note, that the object is running two instances (FoxISAPI.ini is set to run multiple instances in the pool), and that none are activated. What this means is that I hit a request that called SetComplete/SetAbort and let MTS unload the server behind the scenes. If I don't call SetComlete/SetAbort the Activated count would show 2 as well. In fact, any call that goes through the Process method will deactivate objects when lUseMTS is .T. I lUseMTS is not set .t. the server runs without transactions and all server stay activated. You also loose any benefit of MTS altogether…
FoxISAPI Debug Mode
To make it easier to debug your Automation Servers the latest version of FoxISAPI also adds a debug mode. When running in Debug mode FoxISAPI loads the Visual FoxPro development environment as an Automation Server rather than your actual server. The VisualFoxPro.Application object is created and is called with syntax equivalent to this:
oServer=CREATEOBHECT("VisualFoxPro.Application")
oServer.EVAL(oDebug("Server.Class.Method(‘lcFormVars’,’lcIni’,0)")
This causes Visual FoxPro to pop up and call a program file called oDebug. oDebug is a .PRG file that you have to create to respond to this request, and it must be located in your global Visual FoxPro path as set in the Tools|Setting options (most likely your VFP startup path or your Utils directory).
Once oDebug has control it needs to go ahead and parse the parameter passed, which contains the full server string, plus the three standard FoxISAPI parameters. Once the class and method have been parsed you can then create an instance of the class as a VFP object (rather than an Automation object) and then use EVAL() to invoke the method with the parameter returned. The code to do this looks something like thus:
LPARAMETER lcParameter

*** lcParameter = full OLE server string
*** FirstServer.TfirstServer.Process('Method=TestUser=Id1&Name=Rick',

                                     'fox.ini',0)


*** Make VFP Visible
_SCREEN.visible=.T.

SET PATH TO c:\wwapps\wc2\classes; c:\wwapps\common; c:\utilprg

set default to c:\wwapps\foxisapi

SET PROCEDURE TO WWFOXISAPI ADDITIVE
SET PROCEDURE TO FIRSTSERVER ADDITIVE

*** Load Web Connection classes for use in FoxISAPI sample
DO WCONNECT

lnDot2=AT(".",lcParameter,2)
lnBracket=AT("(",lcParameter)

lcParms=EXTRACT(lcParameter,"(",")")
lcClass=EXTRACT(lcParameter,".",".")
lcMethod=SUBSTR(lcParameter,lnDot2 +1, lnBracket - lnDot2 -1)

oServer=CREATE(lcClass)

*** Set the breakpoint here or in your actual code
set step on

*** Now eval the server string
RETURN EVAL("oServer."+lcMethod+"("+lcParms+")")
Notice that you need to explicitly set up your environment here, because VFP starts in your System directory. So, as with any Automation application you need to set your path and set your default. Also, you need to load any class libraries that normally would be built into your project, because you're now calling your server class as a standard VFP class. Hence the SET PROCEDURE TO and the call to WCONNECT.PRG which loads my application framework classes into memory.
Once this code gets control, though, VFP is in full development environment mode. You can SET STEP ON to bring up the debugger and press CTRL-F2 to bring up a command window. Off you go to debug your server interactively.