 Step 10 - Adding security
Security is a basic feature for most applications. In most applications you need to ensure that access to certain features or maybe even all the features of an application are restricted. Web Connection provides a basic security system that makes it easy to restrict access to either selected requests, or all requests. Although the provided feature set is very basic in that it only provides simple password authentication checks and user based restrictions, the system is extensible so that you can plug in your own user validation and authentication rules.
Restricting Access to the Editing Functions
Let's assume for a minute that all users have access to the application to view info and add information. But editing and deleting is allowed only for users that are logged in.
Web Connection supports a couple of built in Authentication mechanisms:
- Basic Authentication (against Windows User Accounts)
- Windows Authentication (against Windows User Accounts)
- User Security Authentication (Cookie based using FoxPro Classes)
Basic and Windows Authentication
The first two can be enabled simply by enabling Basic and/or Windows Authentication in IIS on the virtual directory for the application. To enable either Basic or Windows authentication you can set the following in your wwProcess Subclass:
DEFINE CLASS CustomerProcess AS wwProcess
cAuthenticationMode = "Basic"


FUNCTION EditCustomer

IF !THIS.Authenticate("ANY")
   this.StandardPage("Access Denied","You don't have access to this content. Please log in first.")
   RETURN
ENDIF

*... page logic

Response.ExpandScript()
ENDFUNC

* ... class implementation here
ENDDEFINE
Using Basic or Windows authentication will validate users against the Windows users available on the server, and the browser will pop up a standard Authentication Box:
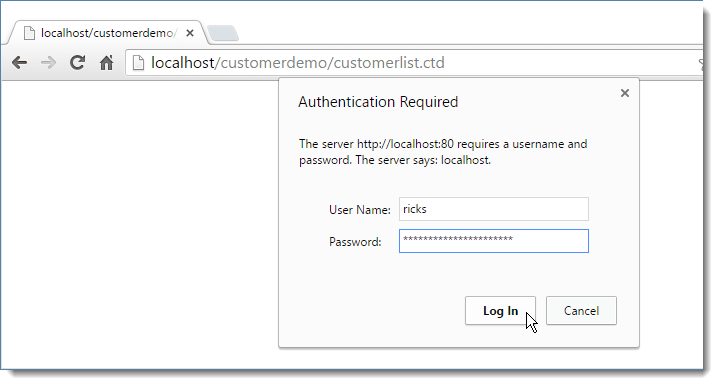
Once you authenticate against a Windows account, the browser then resends the appropriate credentials on subsequent requests. If authentication fails the code above displays an error page. Alternately, you can just redirect to the home page or some other page with Response.Redirect("Homepage.wc").
Domains in Accounts
Windows Authentication by default validates against local accounts of the Web server. Alternately if the server is part of a domain or workgroup you may have to specify the domain name as part of the user name:
MYDOMAIN\ricks. If authentication fails with straight username try the machinename, workgroup or domain as a prefix.
Use SSL with Basic Authentication
If you are using Basic Authentication make sure that all requests use SSL security as the browser captures your username and password as plain text base64 encoded text and sends it on subsequent requests. If requests get high-jacked in cross-domain attacks your username and password might be visible. We don't recommend using Basic Authentication for anything but testing or internal scenarios.
UserSecurity Authentication
If you want to use custom authentication that is controlled by FoxPro code you can usersecurity authentication. The names comes from the wwUserSecurity class that controls access. By default this class uses a FoxPro UserSecurity.dbf table to look up username and password to validate users. You can subclass wwUserSecurity to provide custom authentication and user look up behavior that is more involved than the basics.
For now, find the UserSecurity.dbf table and add a username and password you want to use into that table.
Then change the Authentication Mode to:
DEFINE CLASS CustomerProcess AS wwProcess
cAuthenticationMode = "UserSecurity"

FUNCTION EditCustomer()


IF !THIS.Authenticate("ANY")
   * just return .F. - Authenticate created login request
   RETURN .F.
ENDIF

* ...
Response.ExpandTemplate()
ENDFUNC
Now re-run the EditCustomer page again and you should see the stock HTML based login page:
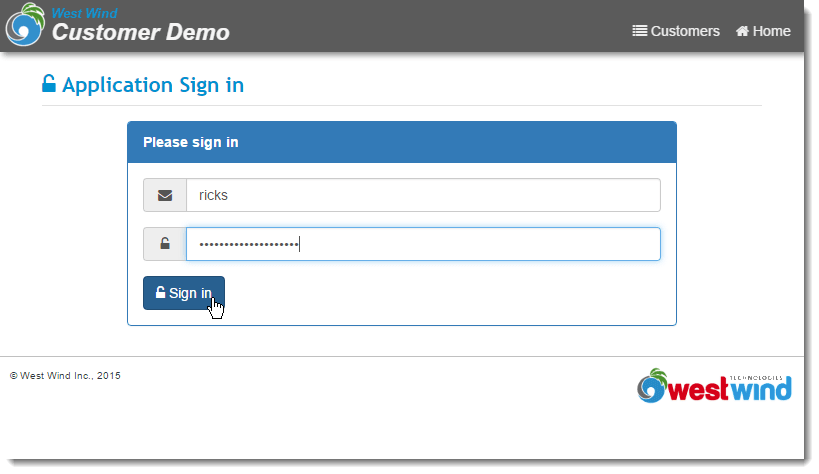
This page is rendered from a template in views\_Login.wcs and you can customize this template for a custom look and feel of your login page.
Once you sign in with the correct credentials you can then access the EditCustomer page.
Checking for Authentication in Code
If you need to check whether a user is authenticated in code, you can check for a specific user with:
lcUserId = Request.GetAuthenticatedUser()
Based on the user ID you can then choose to retrieve a full user object, or perform other user checks. Note that Web Connection stores user authentication info in the wwSession storage across requests. Once authenticated a user's account is not looked up again until the session expires and unless you log out explicitly.
Global Authentication
In the above scenario we've explicitly restricted access the EditCustomer and DeleteCustomer methods by explicitly checking for authentication on these two requests. This works well if you have a few requests that need to be secured while the majority of your app continues to run open to the public.
If you want to lock down the application globally and don't want to allow access to anything or anything but a couple of token landing pages unless users are logged in you can handle the authentication at the top of the code in the OnProcessInit() method instead. The following code allows access to the CustomerList, Login and Logout requests, but requires logging in for anything else (display, edit, delete):
FUNCTION OnProcessInit

LOCAL lcScriptName, llForceLogin
THIS.InitSession("MyApp")

lcScriptName = LOWER(JUSTFNAME(Request.GetPhysicalPath()))
llIgnoreLoginRequest = INLIST(lcScriptName,"default","customerlist","login","logout")

IF !THIS.Authenticate("any","",llIgnoreLoginRequest)
   IF !llIgnoreLoginRequest
	  RETURN .F.
   ENDIF
ENDIF

* ... other per request configuration

RETURN .T.
ENDFUNC
OnProcessInit() is fired on every request before your controller methods are fired. The code above forces every page except the ones listed in the INLIST() call to require a login. So if you now access the customerlist, the detail page, the edit page - all those pages will now validate. The only pages that don't are the landing page and the login and logout pages.
************************************************************************
*  Login
****************************************
FUNCTION Login()

pcErrorMessage = ""
IF Request.IsPostback()
   pcUsername = Request.Form("WebLogin_txtUsername")
   IF this.Authenticate("ANY",@pcErrorMessage)
      Response.Redirect("~/customerlist.ctd")
   ENDIF

   *** Authenticate renders the login form if we failed
   RETURN
ENDIF

*** Only render this on a GET operation
THIS.OnShowAuthenticationForm()

*** Or re-route to a custom view
* Response.ExpandScript("~\MyLogin.ctd")
*   Login

************************************************************************
*  Logout
****************************************
FUNCTION Logout()
this.Authenticate("Logout")
Response.Redirect("customerlist.ctd")
ENDFUNC
*   Logout
The Login calls to an existing helper method on wwProcess called OnShowAuthenticationForm() to show the stock login form. You also create your own form by rendering a template - just make sure to create two fields for WebLogin_txtUsername and WebLogin_txtPassword which ensure that the existing login validation framework can automatically validate your user.
You can also create completely custom authentication by handling authentication and Session management yourself. For more info see the Custom Authentication with UserSecurity topic in the documentation.
The Logout request simply logs the user out and redirects to another page.
Displaying Login Information
Ok, so now we can log in either for every request or for specific requests. Now lets display some login information so the user can tell that he's logged in.
To do this, let's create a partial that we can plug into the Layout page.
In Visual Studio (or your editor of choice) create a new Web Connection Template Content page named LoginMenu_Partial.wcs in the Views folder.
Clear out all the HTML and replace it with the following markup which is just a small HTML fragment:
<% if (!Process.lIsAuthenticated) %>
	<a href="login.ctd">
		<i class="fa fa-lock"></i>
		Sign in
	</a>
<% else %>
	<a href="logout.ctd">
		<i class="fa fa-unlock"></i>
		Sign out <span class="hidable-xs">(<%= Process.cAuthenticatedName %>)</span>
		<img title="<%= Process.cAuthenticatedName %>" src="<%= GravatarLink(Process.cAuthenticatedUser,23) %>" />
	</a>
<% endif %>
This displays a Sign In link when you're not logged in and a Sign out link plus the user name and a Gravatar link based off the user's email address. Gravatar displays an image avatar if the user is registered, otherwise a default image is displayed.
Next add a RenderPartial() expression into the ~\Views\_LayoutPage.wcs page that renders this partial. Find the following HTML in the menu of the Layout page and add the RenderPartial() link to the LoginMenu_Partial page into the HTML:
 <!-- top right nav menu - .menu-hidable for options that hide on small sizes -->
<nav class="banner-menu-top pull-right">
    <%= RenderPartial("~/Views/LoginMenu_Partial.wcs") %>

    <a href="~/customerlist.ctd" class="hidable">
        <i class="fa fa-list"></i>
        Customers
    </a>
    <a href="~/">
        <i class="fa fa-home"></i>
        Home
    </a>
</nav>
If you now re-render the page here's what you get in the left header of the page when you're not signed in:
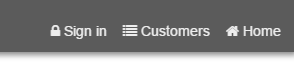
and this when you are signed in:

And there you have - a basic security and login solution that keeps out users that aren't registered. You can override the default behavior easily by adding new authentication methods simply by overriding a few methods.
For more detailed info please check out the security section of the documentation which provides additional information on customization of the authentication process.

Comment or report problem with topic