 Updating and Hotswapping Web Connection Servers
The Web Connection .NET and ISAPI modules include a built-in mechanism for hot swapping an existing COM server while the server is running. This mechanism allows updating of an executable on a live server without taking the server offline first a process which takes a few seconds at most.
The process works like this:
- Upload a new EXE using an upload link
- File is stored in a known file location:
UpdateExeconfig key - Put requests on hold
- Unload running servers
- Hot swap the new EXE into the running Exe:
ExeFileconfig key - Take requests off hold
- Reload file servers - COM servers will auto-restart
This process is automated via two separate HTTP links - one to upload the file and one to swap the servers. The process is automated and managed by two matching links in the Web Connection Administration API for interactive operation, or you can use the wwHttp class to automate the process programmatically.
Write Permissions and File Paths
In order for files to upload and swap, the account that's running the IIS Application Pool has to have full access rights in the
Deploy. Also make sure thatExeFileandUpdateExepoint to valid files. Both files support~\Web relative paths. For example:
Adminstration Web Interface
Using the Web Connection Module Administration page, there are three links that allow you to upload a new server EXE and then hotswap the EXE:
You can find it on the Admin page in the highlighted area:
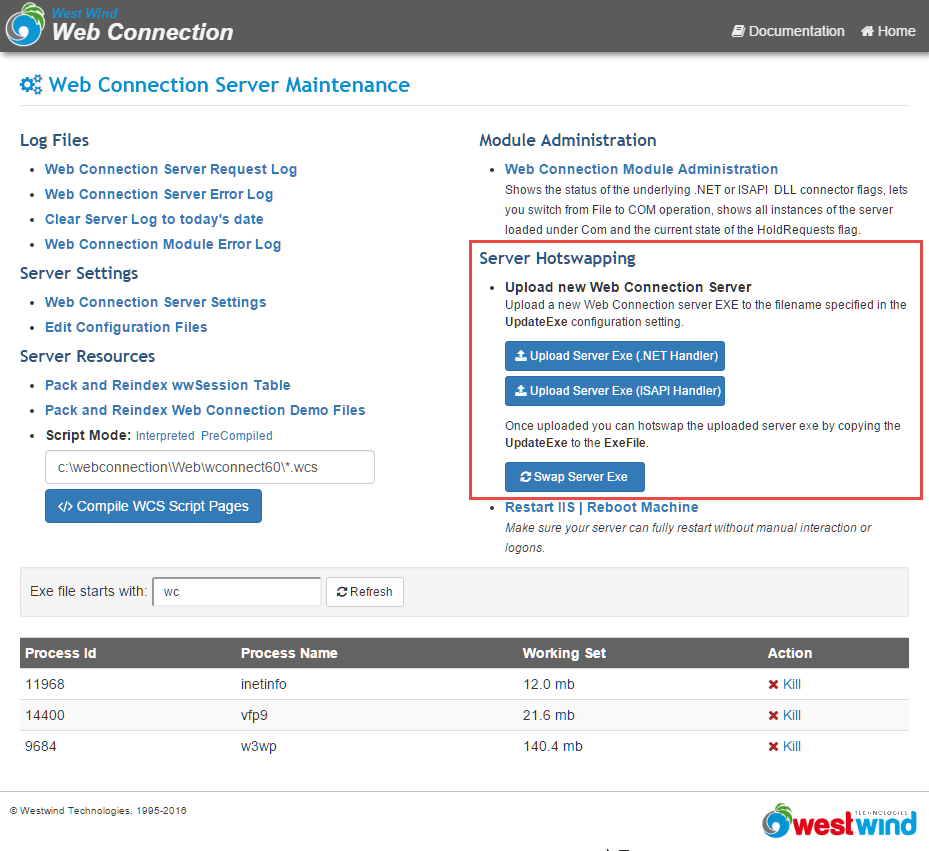
Click one of the Upload links to upload your updated EXE to the server. This is simply a file upload.
Once files have been uploaded you can hotswap, by copying the file specified in the UpdateExeFile configuration setting to the file specified in ExeFile. Web Connection will try to put the server into Server Hold mode that disables incoming requests, then unload all COM servers or file serve
Server Links
There are three different links:
.NET Handler EXE Upload
This uses the .NET module itself to handle the file upload
UploadExe.wcISAPI Handle EXE Upload
This uses the Web Connection server to handle the upload. The ISAPI module doesn't support uploading directly, so this is offloaded to the Web Connection server.
wc.wc?wwMaint~FileUploadHotswap the ExeFile and UpdateExe
This function is built into both the .NET and ISAPI modules. It works reliably only in COM mode as it shuts down the COM objects, and then and copies theUpdateExefile to theExeFile. It can also work in File Mode but all file servers have to be explicitly shut down.
UpdateExe.wc (.NET handler) or wc.wc?_maintain~updatedexe (wc.dll)
Configuration Settings
The process is controlled via the ExeFile and UpdateExe configuration settings in the web.config and wc.ini files.
In web.config:
<webConnectionConfiguration>
  <add key="ExeFile" value="~\..\deploy\wcdemo.exe" />
  <add key="UpdateFile" value="~\..\deploy\wcdemo_Update.exe" />
</webConnectionConfiguration>
In wc.ini:
[Main]
ExeFile=c:\webconnectionprojects\wwdemo\wcdemo.exe
UpdateFile=c:\webconnectionprojects\wwdemo\wcdemo_update.exe
Note that the .ini version requires a full path, while the web.config version understands relative paths relative to the root web folder which makes the values more portable if moved.
Once these values are set the manual upload process allows you to push a binary to the server, and hot swap it.
Automating the process with Bld_yourProject.prg
When you create a new project Web Connection automatically builds a bld_yourProject.prg file that builds your server and creates a base template for uploading a new binary to the server.
Here's the relevant code from this file (this example assumes the EXE name and virtual are WebDemo):
DO wwUtils
DO wwHttp

*** Configure these options to perform tasks automatically
EXE_FILE		  =		  	"Webdemo"
DCOM_ProgId       =			"Webdemo.WebdemoServer"
DCOM_UserId		  =			"Interactive User"

*** Server Update Urls - fix these to point at your production Server/Virtual
HTTP_UPLOADURL    =         "http://localhost/Webdemo/wc.wc?_maintain~uploadexe"
HTTP_UPDATEURL 	  =         "http://localhost/Webdemo/wc.wc?_maintain~UpdateExe"

*** For ISAPI DLL use this UploadUrl (through Web Connection Server)
*HTTP_UPLOADURL    =         "http://localhost/Webdemo/wc.wc?wwmaint~FileUpload"

*** Optional - User name to pre-seed username dialog
WEB_USERNAME 	  =	  		StrExtract(sys(0),""," ")


lcUserNameHttp = InputForm(PADR(WEB_USERNAME,15),"Http Username","Code Update")
IF EMPTY(lcUsernameHttp)
  RETURN
ENDIF

lcPasswordHttp = GetPassword("Please enter your HTTP password")
IF EMPTY(lcPasswordHttp)
  RETURN
ENDIF

WAIT WINDOW "Uploading file to server." + CHR(13) + ;
           "This could take a bit..." NOWAIT

loHttp = CREATEOBJECT("wwHttp")
IF !EMPTY(lcUsernameHttp)
   loHttp.cUsername = lcUsernameHttp
   loHttp.cPassword = lcPasswordHttp
ENDIF
loHttp.nHttpPostMode = 2
loHttp.AddPostKey("File",FULLPATH(EXE_FILE + ".exe"),.T.)
lcHtml = loHttp.HttpGet(HTTP_UPLOADURL)
IF (loHttp.nError != 0) OR ATC("File has been uploaded",lcHtml) = 0
  MESSAGEBOX("Upload failed." + CHR(13) + ;
             loHttp.cErrorMsg)
  RETURN
ENDIF

WAIT WINDOW "File upload completed..." nowait

lcURL = InputForm(PADR(HTTP_UPDATEURL,100),"URL to update Exe","Update")

wait window nowait "Updating Exe File on Web Server..."
loHttp = CREATEOBJECT("wwHttp")
lcHTML = loHttp.HTTPGet(lcUrl,lcUserNameHttp, lcPasswordHttp)

wait clear
IF !"Exe Updated" $ lcHTML
  ShowHTML(lchTML)
ELSE
  MESSAGEBOX("Update completed",64,"Web Connection Server Code Update")
ENDIF
This code basically goes through and programmatically drives the same two links shown in the figure shown earlier using the wwHttp class. The first request goes to:
http://localhost/Webdemo/wc.wc?wwmaint~FileUpload
and uploads the local WebDemo.exe file to the server. This request hits your Web Connection server to actually capture the file and dump it to disk in webdemo_update.exe on the server.
The second request then hits:
http://localhost/Webdemo/wc.wc?_maintain~UpdateExe
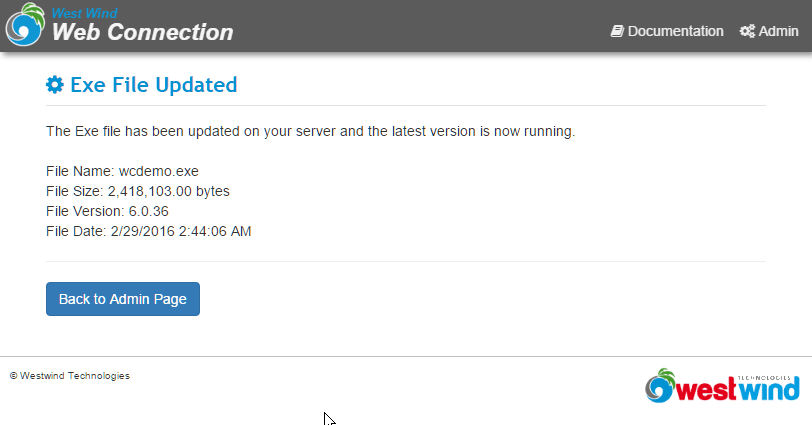
which hot-swaps the exe by shutting down the COM servers, putting the servers on hold, swapping the WebDemo_update.exe to WebDemo.exe, taking the servers off hold and then reloading servers. The latter HTTP result is captured and displayed for you. The server code against the .NET module reads out the new server's write date and version and echo's that back so you can see if the update worked.

Comment or report problem with topic