 IIS Configuration for Web Connection
IIS is the built-in Web Server service in Windows. Although built into Windows, it's an optional Windows Component and has to be explicitly enabled and configured requiring Administrator rights. IIS is a global server installation that runs as a service and can serve many Web Sites simultaneously and is generally what's used for running production Web Connection Web sites.
IIS Alternatives: Web Connection Web Server or IIS Express
Don't have Administrative rights, or don't want to install, configure and manage full IIS? You can use IIS Express or the .NET Core based Web Connection Web Server instead. Both are low impact, locally installed and explicitly executed Web Servers that don't run as system components that work great for local development.
This topic describes configuration through the Web Connection Console UI, using programmatic tools and manually configuring IIS and Web Connection by hand.
- Windows Components required for IIS
- Automatic Configuration
- Programmatic Configuration
- Manual Configuration
All IIS Configuration Tasks require Administrative Rights
All IIS configuration tasks have to run as an Administrator.
Setup.exeandConsole.exeautomatically prompt for rights elevation when launched from the Shell.
Windows Components Required for IIS
IIS first needs to be enabled and configured before you can set up Web Connection to use IIS. IIS is not installed by default on Windows, so it has to be explicitly installed with the correct Windows components.
There are two ways to install it:
- Powershell Script (Windows 10 or Server 2012+)
- Manual Windows Feature Installation
Powershell IIS Feature Installation
The quickest way to install all the components needed by IIS for Web Connection is via a Powershell script called Install-IIS-Features.ps which is provided in the Web Connection install folder and the root folder of every project that is created.
Windows 10 or later or Windows Server 2012 or later are required to run this Powershell script.
To use the script, open an Administrator Powershell Command Prompt:
# Make sure you run as Administrator!
cd \wconnect  # Web Connection install folder
Set-ExecutionPolicy Bypass -Scope Process # may be required
.\Install-IIS-Features.ps1
The script installs IIS Management support, .NET and ISAPI Support, WebSockets, and Windows and Basic Authentication. For more detailed info please on what this script does check out this blog post.
Please review at the Powershell source file in a text editor as there are additional useful configuration options that can be uncommented for additional features:
- Add IIS Rewrite Module
- Add Web Deploy
- Set global Powershell Execution Policy
- Enable localhost Windows Authentication (DisableLoopbackCheck)
These are disabled by default because some additional tools like Chocolatey maybe required to install.
Manually Installing IIS Features
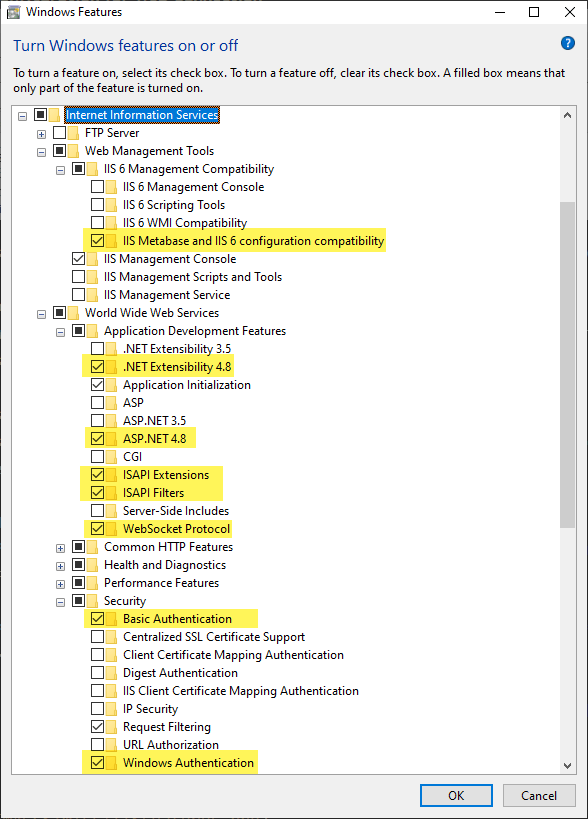
On Windows Clients the IIS configuration features can be found under the Turn Windows Features On and Off from the Start Menu (Programs and Features).
On Windows Server open Server Manager and go to the Manage Toolbar link, choose Add Roles and Features and follow the Wizard interface to add Server Roles.
Here are the required components for Web Connection shown in both the Client and Server UIs (same features, different UI):
On Windows Clients:
On Windows Server (in Server Manager):
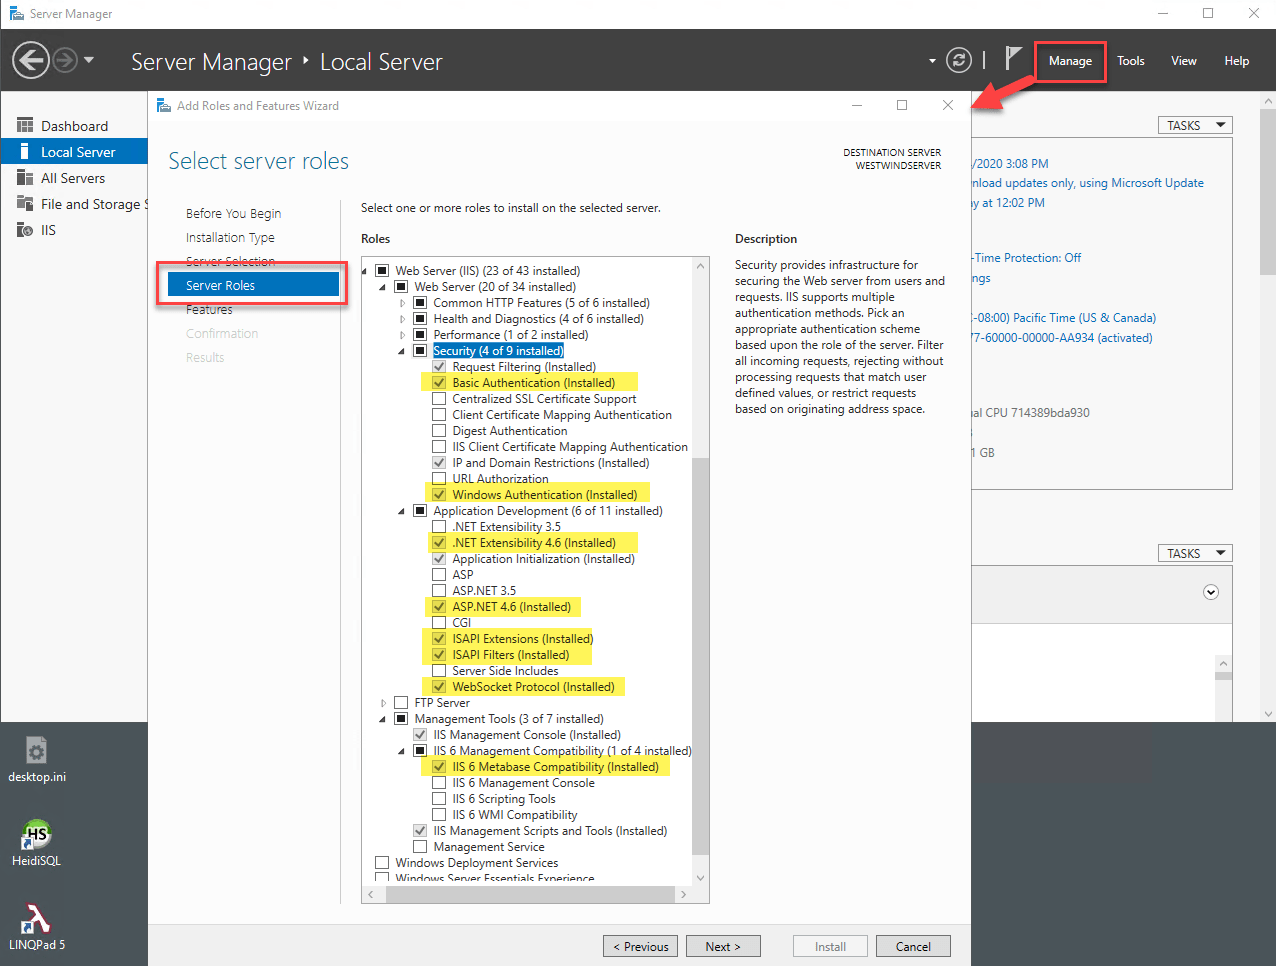
The important and required settings for Web Connection are highlighted:
- IIS Metabase and IIS 6 Configuration compatibility
- ASP.NET and .NET Extensibility
- ISAPI Extensions Support if you use the ISAPI module (classic mode)
- WebSocket support for Live Reload functionality
- Basic and Windows Authentication
Note that the specific .NET version does not matter for the .NET components. Any version above 4.x works.
Automatic Server Configuration
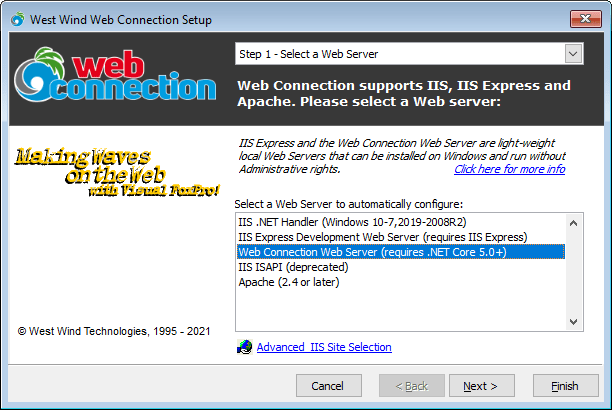
Once the base components have been installed you can use Web Connection's automatic configuration to install Web Connection. You can use Setup.exe to install Web Connection or you can use Console.exe and use the New Project Wizard to create new projects or the Server Configuration Wizard to configure an existing Web site.
In all cases you should use the IIS server setting from the server type drop down or list.
These tools automatically create virtual directories, application pools, script maps, set permissions and get your application ready to work. Generally this is the easiest way to start Web Connection applications on a development set up.
If you're doing a first time installation for Web Connection you're done!
If you are configuring an application for deployment, continue reading.
Programmatic Tools
Web Connection includes utility functions that let you use FoxPro code to programmatically create installation scripts. New projects by default create an IIS configuration script as yourProject_ServerConfig.prg which you can customize using FoxPro code. The script is a great starting point for automated server configuration that you can add your own configuration settings and steps to.
Automated IIS Configuration with _ServerConfig.prg
When you create a new Web Connection Web Connection creates yourProject_ServerConfig.prg file that contains code that automatically configures a Web site for your application based on the standard Web Connection Project format. This code assumes uses convention, to figure out where files live and what the names of installed components are. It assumes that the configuration is run out of the .\Deploy folder of a project and that the Web site lives in a relative path of ..\web\ as a sibling folder to the Deploy folder.
The install script creates or configures a virtual/root directory, creates an IIS Application Pool, creates a temp folder, sets permissions on the Web and temp folders, and registers your EXE server as a COM object (if it exists).
Important: The Web Site you want to install to has to exist in IIS before you can configure it. This does not create the Web Site, but will create everything else. Note the Web Site ID
This script is also compiled right into your compiled .exe file and you can use the CONFIG command line switch to execute the script:
yourProject.exe CONFIG
You can control some configuration settings via the [ServerConfig] section in the yourProject.ini:
[ServerConfig]
Virtual=wconnect
ScriptMaps=wc,wcs,wcsx,wwd,blog
IISPath=IIS://localhost/w3svc/1/root
Virtual
An optional virtual directory to create in the Web site such aswconnect(ie.http://MySite.com/wconnect). You can leave this value blank if for a Root Web site (ie.http://mysite.com). This controls where the Web Connection site is hooked up and the application pool is applied to.Script Maps
This configures any additional script map extensions that Web Connection needs to handle for your application. This maps to<handlers>mappings inweb.config(for the Web Connection .NET Handler) or theHandledExtensionsin theWebConnectionWebServerSettings.xml(for the .NET Core Web Connection Web Server).IISPath
This is the IIS metabase path that identifies the site. It is in the format ofIIS://localhost/w3svc/<SiteId>/rootwhere the Site id is an IIS Web Site Id. 1 is theDefault Web Site. If you're using a different site, you'll need to specify the Site Id. You can find the Site in the IIS Manager by clicking on the Sites node in the tree, which lists all the sites along with their IDs.
Note that the SiteIDs may vary between your local Development and deployed Production setup if you're using a non-default Web site. Make sure you check before running the configuration script.
Finally you can specify the Web site where these settings are applied. The default is: IISPath=IIS://localhost/w3svc/1/root which is the Default Web Site which has an ID of 1 (second to last path segment). You can find the ID of a Web site in the IIS Management Console by looking at Advanced Settings and the ID Property in that view.
Configuration Scripting Tools
The serverConfig file uses Web Connection's built in scripting functions that let you create virtuals and scriptmaps, as well as set path permissions. If you want to fully automate the process in a custom way use yourProject_serverconfig.prg as a template to start from.
In addition you can also access these tools via Console.exe which provides access to VIRTUAL, SCRIPTMAP, DCOMCONFIG via Command Line Options to the Console.
For example:
Create Virtuals:
***Using the Console - last parameter is the IIS Admin path under which virtual is created
* **.NET Handler
DO Console WITH "Virtual", "WebDemo","c:\westwind\webdemo",.F.,"IIS7HANDLER","IIS://localhost/W3SVC/1/ROOT"
* **ISAPI
DO Console WITH "Virtual", "WebDemo","c:\westwind\webdemo",.F.,"IIS7","IIS://localhost/W3SVC/1/ROOT"

* **Interactive
DO Console WITH "Virtual","UI"
Create Scriptmaps:
* **Using the Console
DO Console WITH "ScriptMap", ".wxx","c:\westwind\webdemo\bin\wc.dll",.F.,"IIS7","IIS://localhost/W3SVC/1/ROOT/WebDemo"

* **Interactive
DO Console WITH "ScriptMap", "UI"
Note scriptmap creation will also register the ISAPI extension with the ISAPI restriction list.
Manual Configuration
If you think you don't want to use any tools to configure your application for you, or you really want to understand what settings are required to run your application, the following topics take you through manual configuration for each of the configuration settings.
Create an Application Pool
Any virtual directory or root site in IIS is hosted in what is known as an Application Pool. An Application Pool is the host processes for one or more Web applications. You can see these host processes running as w3wp.exe in Task Manager. There can be multiple Application Pools running at the same time each mapping one or more Web sites/virtuals. Every application must be assigned to an Application Pool, but multiple applications can share a single Application Pool.
To create an Application Pool in IIS:
- Go to the Application Pools section in the Connections Tree
- Right click and select Add Application Pool
- Create with the name of your choice (West Wind Web Connection)
- Choose .NET Framework 4.0 and Integrated Managed Pipeline Mode

Once you've created the Application Pool select it in the list and click on Advanced Settings.
Set the Account Identity
In the Application Pool settings set the Identity for the Application Pool to LocalSystem or whatever account you require to get the permissions you need to run the application. For the latter chose SpecificUser and then enter the username and credentials.
By default the user identity you choose here also is passed to your your Web Connection FoxPro server, so make sure you use an account that has the rights your application needs.
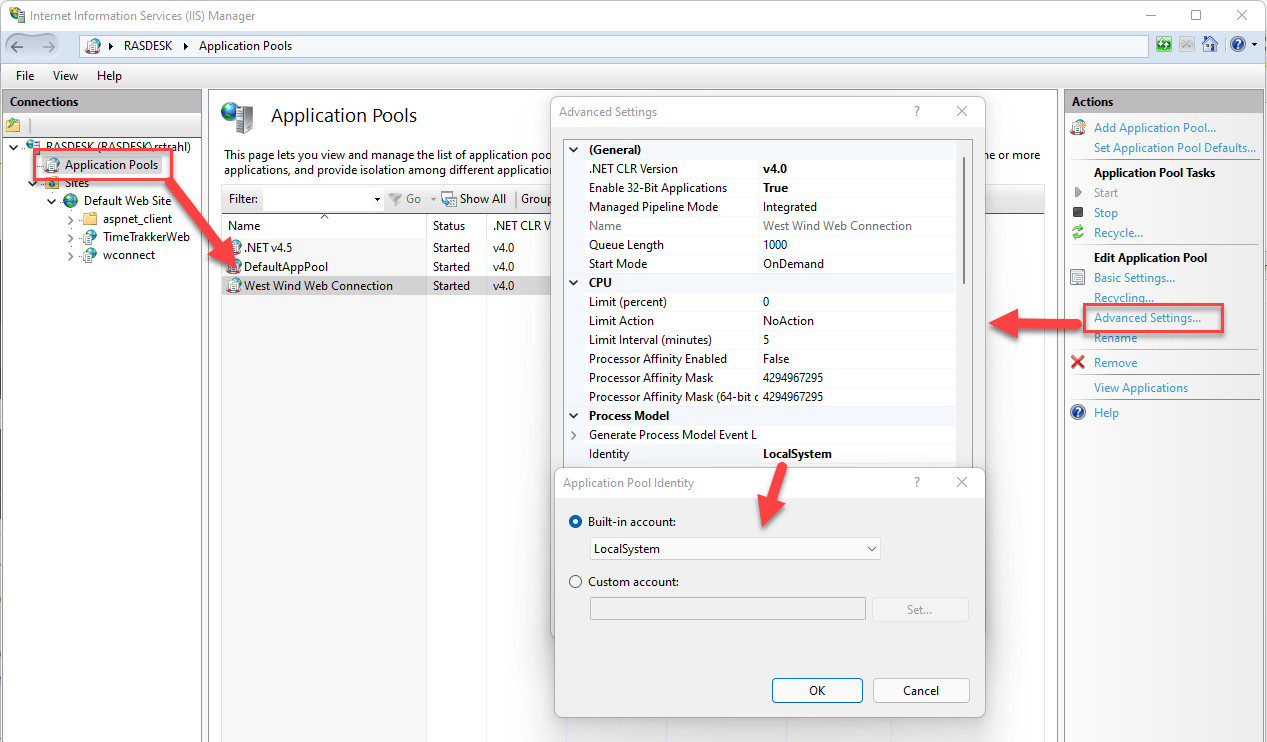
You can also configure various other settings such as the process recycling, idle timeout and various other flags.
Enabling 32 bit Applications on 64 bit Machines for ISAPI
If you are using the
wc.dllISAPI module on a 64 Bit machine you have to so set the Enable 32 Bit Applications flag toTrueso that the 32 bit wc.dll can work. The .NET Module can run natively in 64 bit mode but we still recommend you run in 32 bit mode.
Virtual Directory Configuration
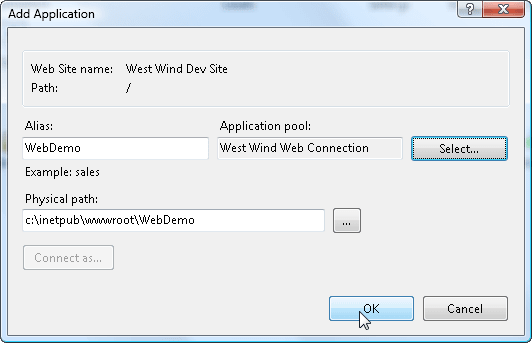
In order to run a Web Connection application you will need to create a virtual directory. The virtual can be configured in the IIS Servies Manager. To create a new virtual directory:
- In the Connections tree go to YourMachine | WebSites | YourWebSite and click Add Application
- Enter the name of the virtual directory (WebDemo) and the path to the Web directory
- Select the West Wind Web Connection Application Pool if it exists
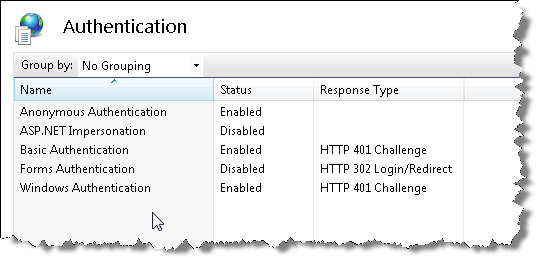
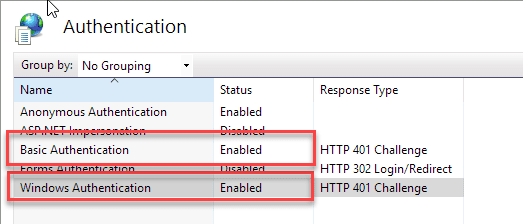
Once the virtual has been created select the Authentication option in the virtual's configuration.
Enable:
- Anonymous Authentication
- Basic Authentication
- Windows Authentication
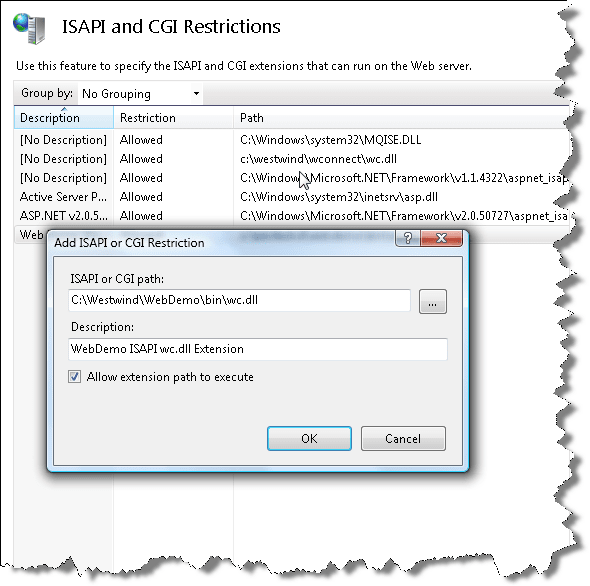
Setting the ISAPI Restrictions for each copy of wc.dll
applies only to the ISAPI module, not the .NET module
Due to the security settings in IIS generic ISAPI and CGI extensions (and ASP and ASP.NET even) are not allowed to execute. Without this setting any direct access or access through scriptmaps (MyPage.wcsx) to the dll will generate a 404.1 (File not found) error.
The extension needs to be explicitly enabled:
- Open IIS Management Console
- Go to the Machine Root in the Connections tree
- Select ISAPI and CGI Restrictions (IIS Settings)
- Click and add your mapping to wc.dll in your Web path
Changed behavior: bin/wc.dll execution is not allowed
IIS 7 and later does not allow direct URL access to any code in a BIN directory. For Web Connection this means that URLs that point at something like this:
http://www.west-wind.com/wconnect/bin/wc.dll?wwDemo~TestPage
are not allowed. There's an easy workaround however.
Use Scriptmaps
There's no need to EVER call wc.dll directly. Instead you should always a scriptmap that points to wc.dll instead. Web Connection always installs the .wc extension so any URL to wc.dll can be easily rewritten using wc.wc?wwDemo~TestPage to provide the same behavior. It's a simple search and replace to switch to scriptmaps. It's more secure and more flexible as you don't have to reference the dll in its exact path.
Creating Script Mappings
You'll also want to configure various script maps for your Web Connection application and you do this by creating mappings between certain extensions (like .wc, .wcsx, or .yourmap) to the ISAPI wc.dll or the managed .NET Handler webconnection.dll. This allows you to serve pages like MyRequest.wc which automatically can route to a MyRequest process method in Web Connection.
The preferred mechanism in IIS7 and IIS8 is to use the .NET Managed Handler, but you can also use the ISAPI extensions for classic applications or applications that span multiple virtual directories.
The process for the .NET Handler and ISAPI extension are slightly different.
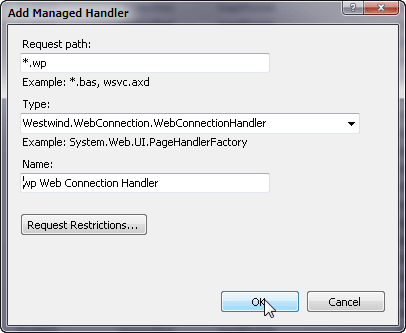
.NET Managed Handler
- Go to the Connections Tree and find your Virtual Directory created earlier
- Select Handler Mappings
- Choose Add Managed Handler on the right sidebar
- Enter your extension as *.wp where wp is the extension
- Enter the path to the WebConnectionModule.dll
- Enter a descriptive name
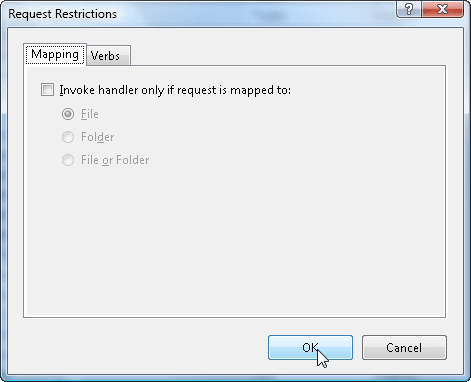
- Click on Request Restrictions
- Uncheck Invoke handler only if file exists
- Select Allow All Verbs (or GET/POST at minimum) on the Verbs page
- Select Script on the Access page
ISAPI ScriptMap
- Go to the Connections Tree and find your Virtual Directory created earlier
- Select Handler Mappings
- Choose Add Script Map on the right sidebar
- Enter your extension as *.wp where wp is the extension
- Enter the path to the wc.dll in your virtual's \bin folder
- Click on Request Restrictions
- Uncheck Invoke handler only if file exists
- Select Allow All Verbs (or GET/POST at minimum) on the Verbs page
- Select Script on the Access page

On both types set the access restrictions:
Web Connection Web Server
The Web Connection Web Server uses only XML based configuration in WebConnectionWebServerSettings.xml (see below).
Web.Config Configuration
Note that all Virtual directory specific configuration settings are written to the web.config file in the Web application's Web root path by IIS, and you can also make setting changes in this configuration file.
.NET Managed Handler
<?xml version="1.0" encoding="UTF-8"?>
<configuration>
   <system.webServer>
      <validation validateIntegratedModeConfiguration="false"/>
      <handlers>
         <add name=".wc_wconnect-module" path="*.wc" verb="*" type="Westwind.WebConnection.WebConnectionHandler,WebConnectionModule" preCondition="integratedMode"/>
         <add name=".wcsx_wconnect-module" path="*.wcsx" verb="*" type="Westwind.WebConnection.WebConnectionHandler,WebConnectionModule" preCondition="integratedMode"/>
         <add name="wp_wconnect" path="*.wp" verb="*" type="Westwind.WebConnection.WebConnectionHandler,WebConnectionModule" preCondition="integratedMode"/>
      </handlers>
   </system.webServer>
</configuration>
Note that the managed handler configuration is 100% portable - if you copy the web.config file these script mappings are automatically available in the copied location.
ISAPI
<?xml version="1.0" encoding="UTF-8"?>
<configuration>
... omitted
    <system.webServer>
        <handlers>
            <add name="WebDemo-wcsx" path="*.wcsx" verb="GET,POST" modules="IsapiModule" scriptProcessor="c:\westwind\webdemo\bin\wc.dll" resourceType="Unspecified" requireAccess="Script" responseBufferLimit="0" />
            <add name="WebDemo-wp" path="*.wp" verb="GET,POST" modules="IsapiModule" scriptProcessor="c:\westwind\webdemo\bin\wc.dll" resourceType="Unspecified" requireAccess="Script" responseBufferLimit="0" />
            <add name="WebDemo-wc" path="*.wc" verb="GET,POST" modules="IsapiModule" scriptProcessor="c:\westwind\webdemo\bin\wc.dll" resourceType="Unspecified" requireAccess="Script" responseBufferLimit="0" />
            <add name="WebDemo-wwsoap" path="*.wwsoap" verb="GET,POST" modules="IsapiModule" scriptProcessor="c:\westwind\webdemo\bin\wc.dll" resourceType="Unspecified" requireAccess="Script" responseBufferLimit="0" />
        </handlers>
    </system.webServer>
</configuration>
Note that the ISAPI extension mapping are not 100% portable as they have to include physical paths. Make sure if you move the application you adjust the location paths for wc.dll.
Web Connection Web Server
The Web Connection Web Server only uses XML based configuration - there's no IIS interface to change any settings. You can set the the following value in WebConnectionWebServerSettings.xml:
<WebConnectionWebServerSettings xmlns:xsi="http://www.w3.org/2001/XMLSchema-instance" xmlns:xsd="http://www.w3.org/2001/XMLSchema">
   <HandledExtensions>.wc,.wcs,.wwd,.blog,.md</HandledExtensions>
   ...
</WebConnectionWebServerSettings>
Security
The following are two very important security settings that you need to make on your Web site in IIS and in the file system.
Use the Configuration Tool
We highly recommend you configure your site using the automated script created for your site. It configures your site configuration including all of the require security settings automatically:
Use the deploy\MyApp_ConfigureServer.prg Script generated for your application
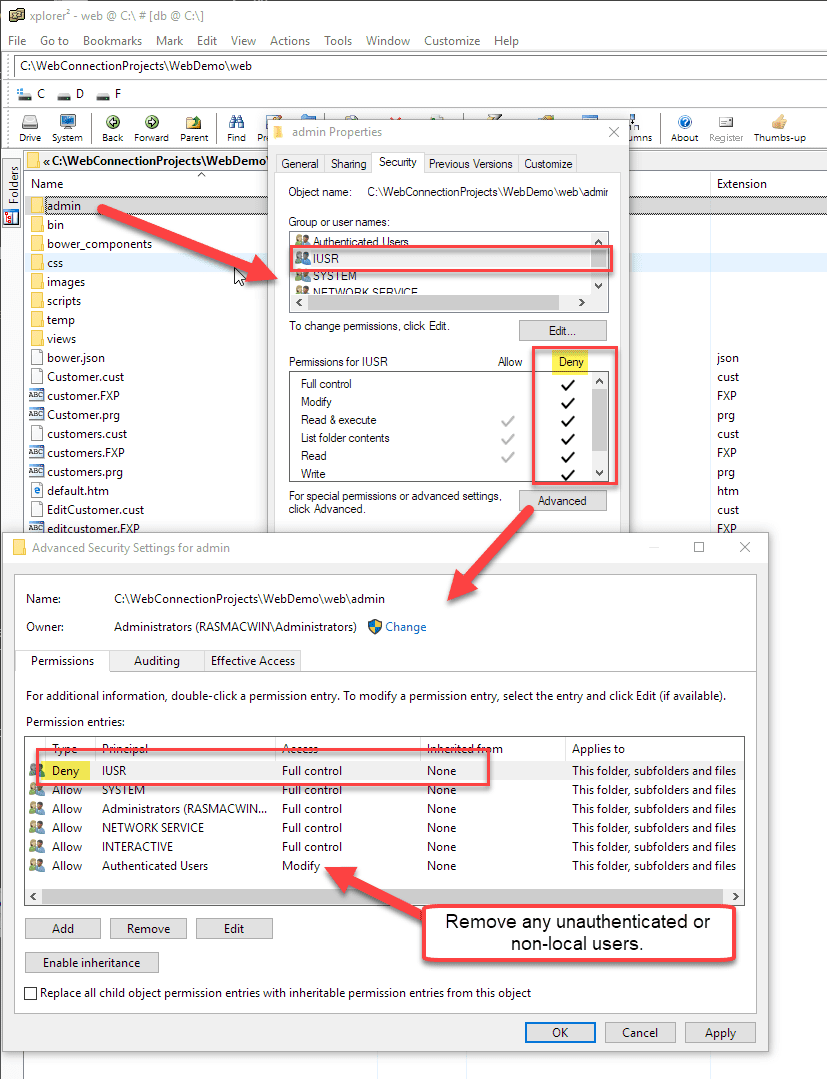
Important: Lock down the Admin Folder
When you install your site on a live server it's vitally important that you secure the Admin folder so that you have to authenticate to access the Administration page.
Start by enabling security on your Web site or Virtual:
Next lock down the Admin folder. Remove or set Deny permissions for any unauthenticated users in the Admin folder and specifically the IUSR account.
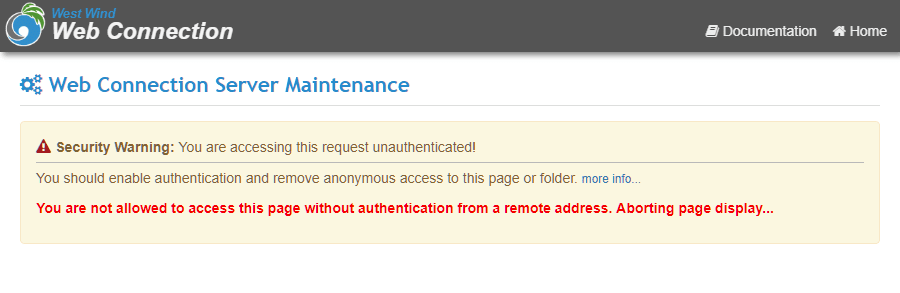
Remote Access to the Adminstration Page only works Authenticated
Starting with Web Connection 6.19 the admin page no longer displays for unauthenticated users when accessing the site remotely. Instead an error message is displayed. Local access - useful for development - continues to work without authenitication but also displays the error message, along with the actual admin links
Temp File Path Permissions
If you are running Web Connection in file based mode for development (or in production) using IIS, make sure that the temp folder configured in the Configuration/WebConnectionConfiguration/TempPath setting in web.config (.NET Handler) or the Path setting in wc.ini (ISAPI) exists and that it has full read and write access for the Application Pool's user account. IIS typically runs in a system context and you need to make sure both IIS and the Web Connection server application can access the temp file folder with full access.
In recent versions this path is a relative path that points .\temp from your project's \deploy\temp folder. In older versions this path may be in a different location - check in wc.ini, or web.config. This is vitally important in order for IIS and the Application Pool to be able to read and write data in that path. It's also vitally important that your Web Connection Server - potentially running under COM impersonation - has full rights in this folder which is determined by the Application Pool Identity described earlier.
User Account Control
Note that User Account Control (UAC) can affect access to local folders. We highly recommend that if you use custom accounts for either the Application Pool or COM Impersonation, that you EXPLICITLY add the account to the permissions to avoid problems with the Administrators group under UAC (which effectively leaves you not an administrator). This is especially true on Windows clients which pretend to be Administrator accounts but really aren't unless you explicitly Run As Administrator.

Comment or report problem with topic