 Fox Server Application Logging
Web Connection includes logging support via a wwRequestLog that can log every request that hits the Web Connection FoxPro server. The logging is managed through the wwServer class and the wwServer::LogRequest() method which is fired at the end of each request. This same logging mechanism is also used to log errors.
Whether logging occurs and what is logged is controlled via the nLogFormat configuration setting in YourApp.ini:
[Main]
LogFormat = 1
or the Server.oConfig.nLogFormat setting in code.
The valid values for nLogFormat are:
- 0 - No Logging - No log data is generated except on errors
- 1 - Minimal Request - Only the request URL is logged
- 2 - Full Request - The URL and Server Variables and Form Data is logged
- 3 - Request and Response - The Url, Server Variables and Form Data and the Response is logged
Note: Errors are always logged regardless of the log format in use.
Log Format Recommendations
Logging request and response data can take enormous amounts of space and very easily overrun FoxPro's file limits. For this reason you need to be aware of much data is getting logged and keep an eye on the log file size. Make sure you either clear the log regularily or back it up if you need to track it.
In production, it's recommended that you limit your logging to no logging or minimal logging unless you have a specific need to look closer at requests due to an application error or security issue that you need to track down. In other words, turn extended logging on when you need it, but don't use it on a regular basis.
For development on the other hand using full request and response logging is quite useful as it allows you to look at a history of requests easily while you're working on and debugging the application. Just make sure
You can set the LogFormat setting on the Web Connection Status form:
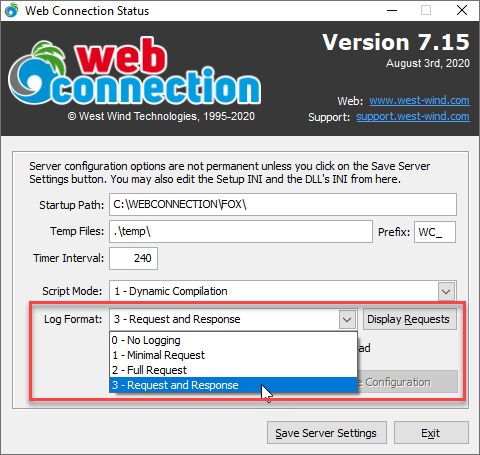
Make sure to Save Settings after changing this value.
Clearing the Log
During development you can clear the log using FoxPro language commands:
USE wwRequestLog EXLCUSVIVE
ZAP

*** or
delete all
pack
pack memo
For a production application you can use the Web interface to clear the log (see below).
Seeing the Request and Response Data for the Last Few Requests
It can be extremely useful to review Web Requests to see exactly what data the client sent or exactly what output the request generated. You can use the Request Browser using the the Display Requests button on the status form. This form shows the last few request and lets you review the request in an easy to use form.

This form shows the last 35 requests and you can look at the Request and Response data which is captured and displayed on the other tabs.
Here's the Response Tab:
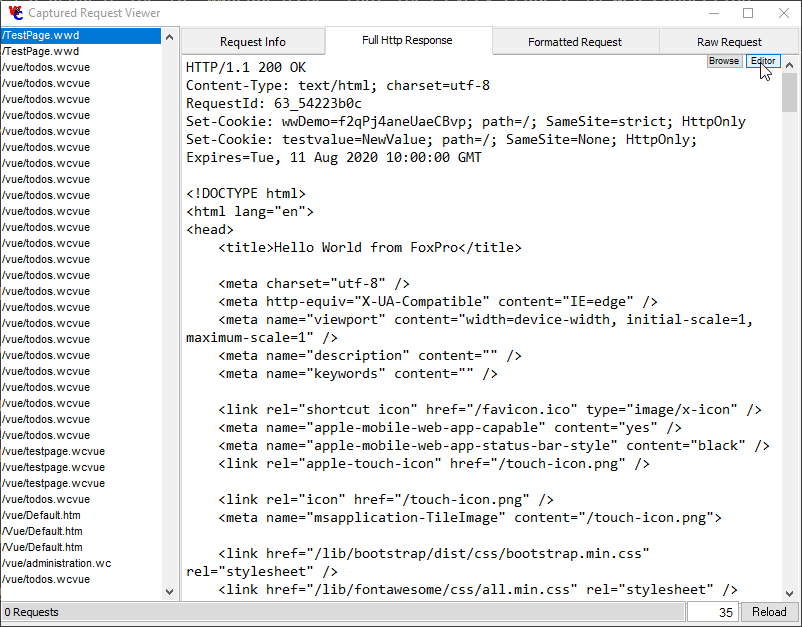
Note that you can click on the Editor and Browse buttons to open the response in an editor or in the case of HTML you can view the rendered HTML. Note that the rendered HTML may not look great as related resources are not available.
Here's the Formatted Request page which takes all the Server variables and Form variables and shows these values in an easy to view format.
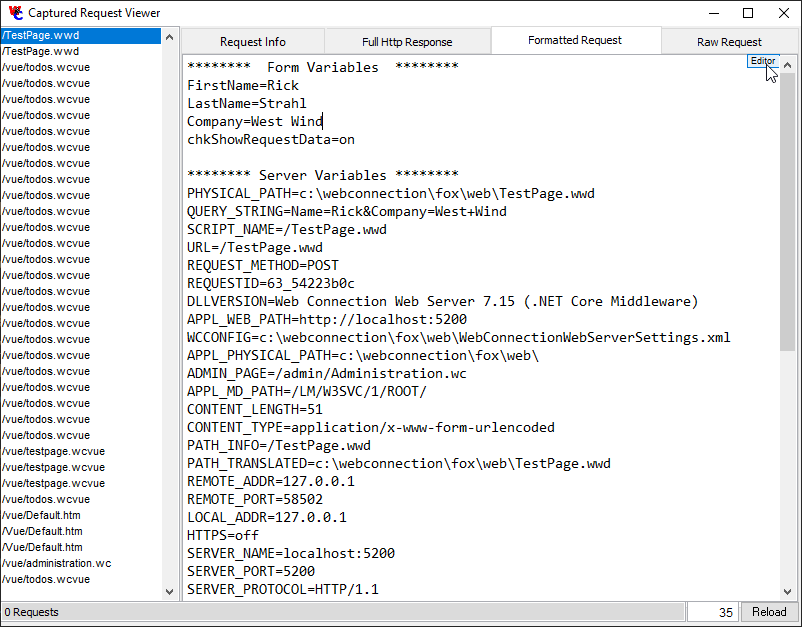
Note that you can click the Editor button that will open this document in an editor as an INI file for easier reading.
The Raw Request tab shows the original raw, encoded Request data. This is not terribly useful except to perhaps simulate a request without actually having to hit the server by assigning this data to a Response object.
Log Modes - Use LogMode 3 - Request and Response
If you want to debug requests, you should ensure you set the logging format to 3 - Request and Response which logs all the request and response data which makes all options available.
If you use log formats 1 or 2 some of the Viewer features are not available since the data is not logged in the log file. Mode 1 only logs the URL and basic request information, but no Request and Response data so the Request and Response tabs are disabled. Mode 2 only shows request data, but has no Response data.
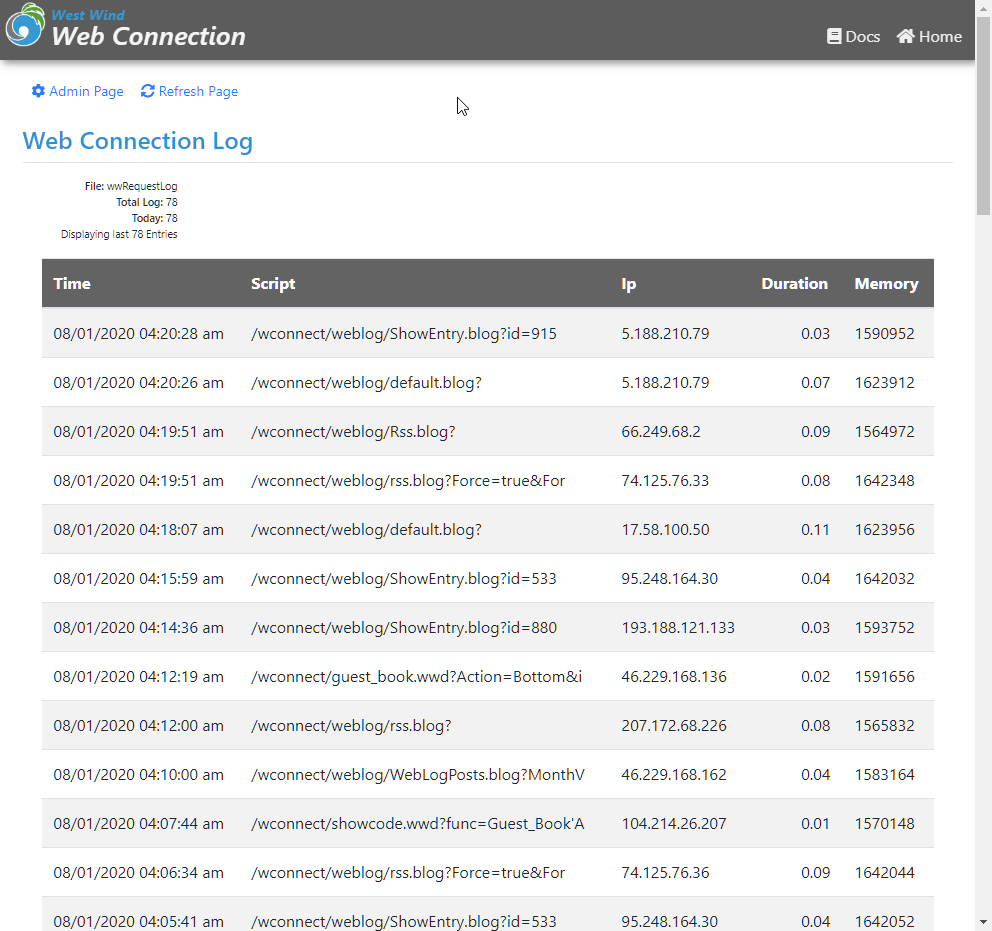
Viewing and Managing the Logs via the Administration Web Page
The Logs can also be viewed from the Web via the Administration interface. But the log information available via this interface is more basic.

These links let you view the Request and Error Logs as well as clear out the log to today's date.
And here's the error log:

Clearing the Log via Web Link
Clearing the log can be done via the Clear Log button. Be aware that this requires that you have EXCLUSIVE access to the FoxPro table so the table can be packed. To do this first set your server Load One Server at the top of the Administration page to load a single server instance. Then go run the log deletion link. When done restart all servers via Load Servers.
Error Logging
Error logging is always on regardless of the log format that is active. An application can write to the log via:
*** Log an Exception
Server.LogError(loException)

*** Log a message
Server.LogError("An unknown error Occurred")
Log information is stored in the wwWebRequestLog in the Error field which is .t. or .f. or 0 or 1 in SQL Server.
The most common case for error logging is automatic logging of errors when a request fails. When a request fails an error log entry is automatically added to the log file using the Server.LogError(loException) syntax.
Sql Server Logs
The logging infrastructure supports logging to a FoxPro wwWebRequestLog.dbf file by default. However, you can also switch the application to use SQL Server for logging.
To do this:
- Enable SQL System Files (Request Log and Session File)
- Create the Tables
- Startup the SQL Connection
Enable Sql Logging via Compiler switch
By default logging and Session data goes into FoxPro tables. To enable SQL Server Logging and Sessions you need to set a compiler switch in wconnect_override.h:
#UNDEFINE WWC_USE_SQL_SYSTEMFILES
#DEFINE WWC_USE_SQL_SYSTEMFILES     	.T.
Make sure you recompile all of your files so the compiler switch is applied:
DO CompileWc && in Web Connection Tools path
Or build your EXE/App if you run your application with compiled files.
This enables the following code in the default Web Connection MyServer::Onload() method template in the appMain.prg:
* In MyServer::OnLoad()
#IF WWC_USE_SQL_SYSTEMFILES
	THIS.oSQL = CREATE("wwSQL")
	IF !THIS.oSQL.Connect(THIS.oConfig.cSQLConnectString)
	   MESSAGEBOX("Couldn't connect to system SQL Service. Check your SQL Connect string",48,"Web Connection")
	   CANCEL
    ENDIF
    this.oSql.EnableUnicodeToAnsiMapping(.T.)
#ENDIF
Make sure you set the SqlConnectionString value in the YourApp.ini file to point at your database.
Create the SQL Server Tables
Web Connection provides a script to create the SQL Server tables for sessions and logging which can be found in /templates/Westwind.sql. To create the tables point at your database. To run that script you can use:
- The Management Console and Create SQL Server Tables
- Run the
Westwind.sqlscript in a database to add the tables to (must exist)
The relevant SQL command to create the table is this (but please always check Westwind.sql for current version):
CREATE TABLE [dbo].[wwrequestlog](
	[time] [datetime] NOT NULL DEFAULT getdate(),
	[reqid] [varchar](25) NOT NULL DEFAULT '',
	[script] [varchar](50) NOT NULL DEFAULT '',
	[querystr] [varchar](1024) NOT NULL DEFAULT '',
	[verb] [varchar](10) NOT NULL DEFAULT '',
	[duration] [numeric](7, 3) NOT NULL DEFAULT 0,
	[remoteaddr] [varchar](16) NOT NULL DEFAULT '',
	[memused] [varchar](15) NOT NULL DEFAULT '',
	[error] [bit] NOT NULL DEFAULT 0,
	[reqdata] [varchar](max) NOT NULL DEFAULT '',
	[servervars] [varchar](max) NOT NULL DEFAULT '',
	[browser] [varchar](255) NOT NULL DEFAULT '',
	[referrer] [varchar](255) NOT NULL DEFAULT '',
	[result] [varchar](max) NOT NULL DEFAULT '',
	[account] [varchar](50) NOT NULL DEFAULT ''
) ON [PRIMARY] TEXTIMAGE_ON [PRIMARY]
And with that you should be ready to go and use SQL Server tables.

Comment or report problem with topic