 Creating a self contained File Based Server
As of version 5.60 Web Connection supports file based deployment that is capable of running on low cost hosts. File based hosting in this environment requires that you create a fully self contained installation where your Web, Application, Data and Support files are all self contained in a single directory hierarchy.
The idea of installation is to get it running on your local machine. After you've got it running there the entire setup should be xCopy deployable (via FTP most likely) to the live server where no further setup should be required beyond the virtual directory creation your Discount ISP will have set up for you).
Requirements
The requirements for a self contained File Based server are:- .NET 2.0 or later enabled in IIS and the virtual directory or root site
- Your site must be allowed to run in Full Trust <trust level="Full" /> in web.config
- The account that the Application Pool runs under must have read/write access in the Web folder
- Your Web Connection application must run as an EXE File Based server
- IIS 7 or later
Building your Application
The first step is to build your application and make sure it all works as expected. Create the application in the FoxPro development environment and test it until it is solid and runs consistently.Compile your Application into an EXE
Once your app is a stable state, compile the application into a standalone EXE file. UseBUILD EXE MyApplication from MyApplication RECOMPILETest again using the standalone EXE launched from Explorer to make sure that everything works the same as you expect.
Now let's move the application into the webconnection.deploy folder
Copying files
Create a new folder in your Web application's site and name it:webconnection.deploy
then copy all files that your application needs to run into it. At minimum:
- MyApplication.exe (your compiled EXE)
- MyApplication.ini
- config.fpw (IMPORTANT: SAFETY=OFF, RESOURCE=OFF, PATH=)
- wconnect.h (required for dynamic WCF Page compilation)
- VFP9R.dll
- VFP9rEnu.dll (or culture specific version for your locale)
- msvcr71.dll
- wwIPStuff.dll
- wwDotNetBridge.dll
- zlib1.dll
- Any other files your application uses (Dbf files, INI files)
Make sure you include all local dependencies of your application here either in this folder or subfolders and that your application sets paths to these folders when it starts up (in yourAppServer.OnLoad()).
Once you've gone through the rest of this install you should be able to copy the entire folder structure as is to your ISP with only a couple of small adjustments in your app.ini and web.config file.
Create your Temp Folder and set the Temp Path
Since the application needs to be totally self-contained with no external folders, we need to create the temp folder underneath the deployment root.Create a \TEMP\WC folder underneath the deploy folder. Now edit your MyApplication.ini file and change the TempFilePath to match the path of the temp\wc folder. On your local machine for testing you will know what this path is easily.
TempFilePath="c:\westwind\sidebysidedeploy\webconnection.deploy\temp\wc\"
Template="WC_"
You also need to set the matching TempPath in the web.config.
<webConnectionConfiguration>
  <add key="TempPath" value="E:\web\rickstrahld\htdocs\webconnection.deploy\temp\wc\" />
  <add key="TempFilePrefix" value="WC_" />
</webConnectionConfiguration>
The Temp Path and Template both files need to match exactly. Note that the path for the live deployed application on the live server will be different than the local install so you'll have to adjust the paths accordingly. This will be the only thing that changes between live and local installs.
Relative Pathing using ~\
A simpler alternative is to use ~\ pathing which replaces the startup path for the INI with a known base path. Using this syntax is portable and can be xcopy deployed.
In the YourApp.ini file the tilde (~) specifies the EXE's current directory:
TempFilePath="~\temp\wc\"
Template="WC_"
Note the above is relative to the startup EXE file.
You also need to set the matching TempPath in the web.config. Here the tilde (~) is relative to the Web application's root directory:
<webConnectionConfiguration>
  <add key="TempPath" value="~\webconnection.deploy\temp\wc\" />
  <add key="TempFilePrefix" value="WC_" />
</webConnectionConfiguration>
Here the tilde (~) specifies the application's root directory so the path includes the webconnection.deploy folder.
How do I get the full Path on an ISP?
On a live ISP installation getting that temp path is a little more difficult because you won't know the exact file system path offhand. To find out the base path of the Web site you can access YourSite.com\admin\admin.aspx (after you've copied up your files to the server (see next step)) and look in the right hand corner of the toolbar for the Application path:
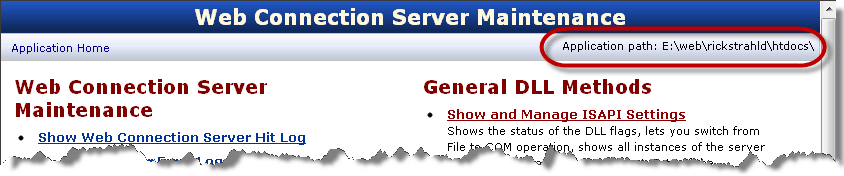
to get the same path information.
then add the \webconnection.deploy\temp\wc\ path to the value found there into the INI. However, the easier way is to simply use the ~\ syntax described in the last section.
Configure your Web.Config
In order to run in self-starting File Based mode you need to make a couple of small configuration switches in your web.config file:- Set up your ExeFile path
This setting determines where you EXE exists so Web Connection can launch it. - Set the Startup Instance Count and Enable AutoStarting
This determines how many instances are loaded automatically when the first hit arrives the Web Connection Module. First hit will load x number of instances.
The settings relevant to EXE based execution and auto-loading are:
  <webConnectionConfiguration>
    <add key="TempPath" value="~\WebConnection.deploy\temp\wc\" />
    <add key="TempFilePrefix" value="WC_" />
    <add key="ExeFile" value="~\WebConnection.deploy\SideBySideDeploy.exe" />
    <add key="ServerCount" value="2" />
    <add key="AutoStartServers" value="True" />
    <add key="MessagingMechanism" value="File" />
  </webConnectionConfiguration>
ExeFile, ServerCount and AutoStartServers determine how many servers are loaded and whether they are loaded.
Create your Virtual Directory
If you're running on an ISP hosted site you don't need to follow the next step since the ISP will provide your site or virtual directory for you.If you're copying to your own server, create a virtual directory (or Web Site) for the Web folder. Assign an Application Pool to it and make sure the Application Pool Identity has rights to read and write in this folder and has access to any other resources you might need to run the application (SQL Connections, files on the system etc.).
For more information on setting up a virtual directory and application pool see the Server Configuration Topics for Windows 7,2008 and XP, 2003 here.
Switch your Web Application to use the Web Connection Module
Next it's vital that you use the Web Connection module to run your Web application in order to be able to run under ASP.NET required for most discount hosts.Configuring the the Web Connection module involves mapping all script maps of your application (.wcsx, .wc, .wcs, .yours) to the Web Connection module. Note only .wc and your custom extension are usually required - the others are more convenience extensions.
IIS 7 and later (Windows 7, Vista, 2008)
For IIS 7 and later in integrated mode your need to add the following (some of these may already be set or commented in your web.config file):
<system.webServer>
  <validation validateIntegratedModeConfiguration="false" />
  <handlers>
    <!-- Web Connection Module in IIS 7 in Integrated Mode -->
    <add name="*.sbsd_wconnect" path="*.sbsd" verb="*" type="Westwind.WebConnection.WebConnectionHandler,WebConnectionModule" preCondition="integratedMode,runtimeVersionv2.0" />
    <add name="*.wc_wconnect" path="*.wc" verb="*" type="Westwind.WebConnection.WebConnectionHandler,WebConnectionModule" preCondition="integratedMode,runtimeVersionv2.0" />
    <add name="*.wcsx_wconnect" path="*.wcsx" verb="*" type="Westwind.WebConnection.WebConnectionHandler,WebConnectionModule" preCondition="integratedMode,runtimeVersionv2.0" />
    <add name="*.wcs_wconnect" path="*.wcs" verb="*" type="Westwind.WebConnection.WebConnectionHandler,WebConnectionModule" preCondition="integratedMode,runtimeVersionv2.0" />
    <add name="*.wwsoap_wconnect" path="*.wwsoap" verb="*" type="Westwind.WebConnection.WebConnectionHandler,WebConnectionModule" preCondition="integratedMode,runtimeVersionv2.0" />
    <!-- end IIS 7 in Integrated Mode -->
  </handlers>
You can add/remove any of the scriptmaps as needed to this list. These maps are portable and are stored in web.config - they are xcopy deployable so no further configuration is required when you move them to a live site!
Ready to test your application
Your application is now ready for running. If all is well you can start running your server requests immedediately.However, I prefer to do things one step at a time, so I tend to load servers manually first and see if that works. To do so go to the ISAPI/Module ShowStatus Page. For example:
http://rickstrahldev.com/wc.wc?_maintain~ShowStatus
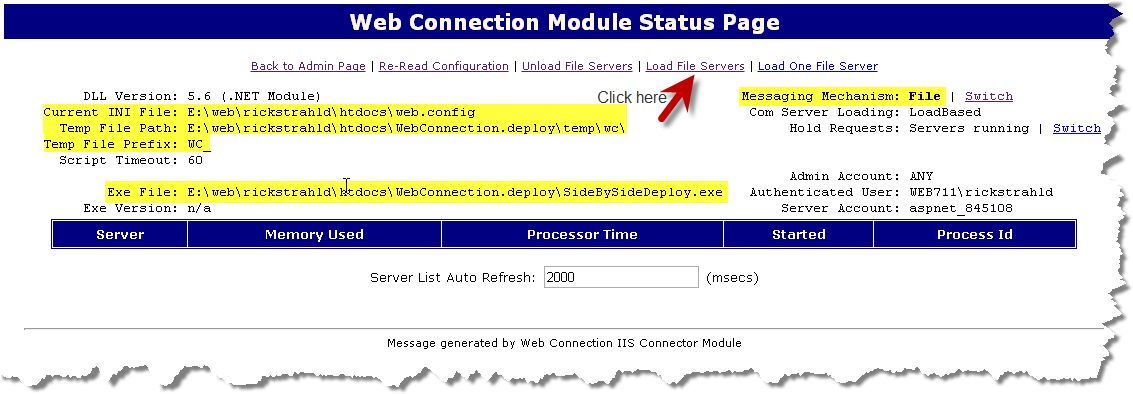
Check the settings highlighted in yellow and make sure they are correct! If they look right click on the Load File Servers.
If all goes well you should now have 2 file instances showing in your list of servers:

If you see them here that means they launched and are running. Server status in this list will update every 2 seconds by default.
Note that servers are not launched on the desktop - they are invisible because they run in a system OS session. There's no way to get visible servers. If you need to see request data you can monitor the service logs.
Servers are now loaded but now go into your application and hit some requests - your requests should now be working assuming your server is running. You should see the processor time go up as requests are processed in the server list.
You can use the server list to see active servers and you can use this page to start and stop servers. Stopping servers here will physically kill the server processes after waiting for a couple of seconds (to allow requests to run out).
TroubleShooting
Test Locally!
Troubleshooting server failures can be difficult on a remote site. Therefore make very sure you first test your site thouroughly locally. Start by running the EXE out of the deployment folder from Explorer - that way you get a visible window and any server startup errors or program errors will show up visibly.
Once that works run the app with auto start by setting the web.config ServerCount and AutoStartServers flags in web.config. Only if that works perfectly should you send your application to a live server.
Common Startup Failures
The most common EXE startup failures have to do with UI popping up during the server's startup phase. Testing should catch this in most cases but make sure you have SET RESOURCE OFF and SET SAFETY OFF preferrably in config.fpw so it happens BEFORE FoxPro starts.
Also make sure you file paths are correct and point at the right data. File open dialogs will hang a server.
Some Server Tuning
Because a Web Connection server runs invisibly you'll want to adjust a few of the server's startup options to remove some overhead related to UI processing. The values in bold should be addressed:[Main] TempFilePath=~\temp\wc\ Template=WC_ TimerInterval=200 LogToFile=Off ShowStatus=Off ShowServerForm=Off SaveRequestFiles=Off UseMTS=Off COMReleaseUrl=http://rickstrahldev/SideBySideDeploy/bin/wc.dll?_maintain~release Adminemail= Adminmailpassword= Adminmailserver= Adminmailusername= Sqlconnectstring= Adminsenderroremail=Off Debugmode=Off Showrequestdata=Off Unattendedcommode=Off Memusage=8176 Pageparsemode=2 Scriptmode=1
Most of these should be fairly self-explanatory.
The last two however might require some explanation:
PageParseMode = 2
This flag determines how Web Control Pages are processed and mode 2 means to Parse and Compile Pages. This means if a page changes the page is parsed and forcibly recompiled by Web Connection, resulting in letting you basically create a new page and its code behind dynmamically while the site is running. If you want to dynamically change pages online use a value of 2.
If you always have compiled FXP pages and only want to execute those, set the mode to 3 - Run Only. This is by far the most performant option, but it does make it hard to actually update the FXP files because FoxPro locks them into memory.
ScriptMode = 1
ScriptMode determines how .wcs Script files are parsed. 1 - Dynamic Compilation means that pages are dynamically parsed and compiled if a script file has changed
Note that both of these script modes have some limitations: Namely

Comment or report problem with topic