 Web Monitor Configuration Form
 Web Monitor Configuration Form
The Web Monitor Configuration form is used to configure the application specific settings that apply for all Web Monitor sites and are used as defaults when new sites are created.
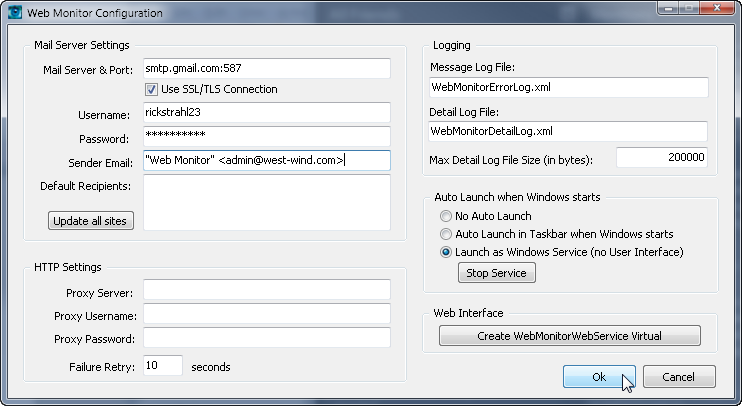
Mail Server and Port
The IP Address or domain name of the Mail server that is used to send email notifications for failure and back up messages. If the server uses a port other than the default port of 25, you can specify the port by appending it with a separating colon (servername:587).
Mail Server Examples:
- smtp.myserver.com
- 127.0.0.1
- smtp.gmail.com:587
Use SSL/TLS
Determines whether the SMTP connection encrypts data with SSL/TLS. Use this flag only if the server supports. Most public SMTP servers like smtp.google.com require secure connections.
Username and Password
Optional username and password entries if your mail server requires you to login before allowing to send SMTP email. This should be required only if you're not using a local/intranet email server where relaying is prohibited.
Default Sender Email
This is the default name that is displayed as the Sender when sending emails. This value can be overridden in the Email Info Tab for each site.
Default Recipients
One or more email addresses seperated by carriage returns that are notified by failure and back up messages. This value is filled in by default for each new site created and can be be overridden in the Email Info Tab for each site.
The Update all sites button allows you to push the values from the Default Recipients field to all the individual sites overwriting any existing recipients. This can be useful if all your sites use the same contacts which is a common scenario. In this case this entry field should be the only place you update recipients for emails.
Remember email addresses can contain page/cell phone SMS addresses. Use a * after the email address to indicate the address is a paging/SMS device to keep the message sent as small as possible.
Examples of email addresses:
- admin@mysite.com
- "WebMonitor Admin" <admin@mysite.com>
- 8082833322@att.mobile.net*
HTTP Settings
Proxy ServerThe optional domain name and port of a proxy server in the format:
proxy.server.com:8080
Required only if you must use a proxy server in order to access HTTP content from your machine.
Proxy Username and Password
The optional Proxy login username and password values if the proxy server requires logins.
Failure Retry
This option allows you to set a failure timeout treshold to minimize false positives by delaying marking a request as fails and retrying the request to verify the failure after a short timeout. When this value is set to a non-zero number of seconds the request is flagged as potentially failed (showing an alert icon) and then retried after the specified number of seconds. Only if the request fails again is it considered failed and notification and failure actions are fired.
This option is useful if you get many false negatives for failures. Some sites (especially ASP.NET sites) can often be slow to startup if they have been idle for a long time and the server is busy. The treshold makes sure that you don't get notified of a 'potential' failure but only if the failure can be verfied twice in a row.
Leave this value at 0 if you always want to be notified on the first failure. Otherwise set this value to a short retry timeout of a few seconds to retry and double check.
Auto Launch when Windows Starts
Web Monitor is capable of running in three different modes:- Windows Application (No Auto Launch)
In this mode Web Monitor simply starts as a standalone Windows application that runs on the desktop. - Windows Application in Taskbar (Auto Launch in Taskbar)
You can also launch Web Monitor to run as a TrayIcon application which doesn't shutdown but rather parks itself on the Windows taskbar running in the background. You can still activate the Web Monitor UI from this option. To start Web Monitor in Taskbar use the -trayicon command line switch. - Windows Service (Launch as Windows Service)
Finally you can set up Web Monitor to automatically start as a Windows Service when Windows starts. No logon is required for this option and the service runs under the SYSTEM context. This mode has no user interface, so you should use the Windows Application to make any configuration changes and the startup operations. Note if the Windows Service is running and you make any changes to the sites you need to stop and start the service, which you can do from the button on this form.It's important to note that when you unselect the Windows Service option, the Web Monitor Service is actually uninstalled. To reinstall simply re-select the Launch as Windows Service option.
Web Interface
Clicking on this button takes you to the Admin interface that allows configuration of the Web Monitor Web Virtual in IIS. Here you can select a local Web site and the name of the virtual to create to set up the remote Web administration interface to the Web Monitor Service.
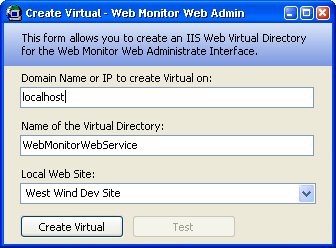
Once you've created a virtual directory in this fashion you will be able to access the specified virtual directory and remote administer Web Monitor through the Web interface.
Note:
The remote Web Administration feature is available only in the Service version of West Wind Web Monitor.
See also
Web Monitor Configuration Form | Monitoring Tab | Email Info Tab
Comment or report problem with topic